Addressing Phidgets: Difference between revisions
No edit summary |
No edit summary |
||
| Line 4: | Line 4: | ||
The following video summarizes the basics of how to address the proper channel in your code: | The following video summarizes the basics of how to address the proper channel in your code: | ||
<center>{{#ev:youtube|XKSenz9txKE}}</center> | <center>{{#ev:youtube|XKSenz9txKE|||||rel=0}}</center> | ||
==Intro to Addressing Phidgets== | ==Intro to Addressing Phidgets== | ||
Revision as of 20:23, 9 August 2019
5 . Addressing Phidgets
Before opening a Phidget channel, it is important to set enough of the addressing properties to ensure your program attaches to the right Phidgets. Keep reading for an overview of the parameters available to you.
The following video summarizes the basics of how to address the proper channel in your code:
Intro to Addressing Phidgets
When opening a channel, the Phidget library will attach it to the first available physical channel that matches all given addressing parameters. If no addressing parameters are specified, the first available channel of the correct class will be attached. This works well for single Phidgets, but will give undefined results when two similar Phidgets are plugged in to the same computer.
For this reason, it is important to specify enough addressing information to make sure your program attaches to the right Phidget.
A good practice is to always specify at least the device serial number and the channel number of the channel on the Phidget that should be attached to the software channel. Even when not strictly necessary, setting as many addressing properties as possible can ensure that code will not break in the future.
Addressing Properties
Now we will outline the available addressing properties available to you, and describe what they are. You may specify as many, or as few as is necessary for your application.
Channel Class
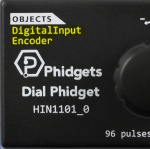
Each channel exported by a Phidget device has channel class. The channel class describes the type of Phidget being used, and must be known to start interacting with the Phidget. A Phidget can have multiple channels, and they may even have different channel classes, like the example shown in the image to the right. You can find which channel classes are used with your Phidget by finding them listed on the enclosure, or on the API tab of the product's page.
The channelClass property is implied by the handle and API you use to communicate with the Phidget. For instance a DigitalOutput channel has a channel class of DigitalOutput, and a HumiditySensor channel has a channel class of HumiditySensor.
Get the channel class with the ChannelClass property. It's often useful for distinguishing which Phidget channel called a shared Attach, Detach, or Error Event Handler.
Channel Number
Each channel on a Phidget device has a channel number, normally starting at 0. The channel number will allow you to distinguish between multiple channels on a single device. If the Phidget has more than one channel class, the numbering starts back at zero for each class. For example, the Thumbstick Phidget has two VoltageRatioInput channels (0 and 1), and a single DigitalInput channel (0).
The channel property must be set to ensure the physical channel the Phidget software library attaches to is right one. If the channel property is not specified, the library will attach to channel 0 if available, or the next available channel if not.
Set the channel number with the Channel property.
Hub Port
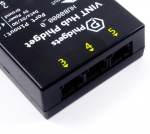
VINT hubs have a number of ports that VINT devices can be connected to. To ensure the correct VINT device is attached, the hub port must be specified. If two temperature sensors are attached to the same hub, and the hub port is not specified prior to opening a TemperatureSensor channel, there is no way to know which temperature sensor will be attached.
Set the hub port with the HubPort property.
"Is Hub Port Device"

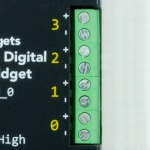
VINT ports have the ability to be used with analog sensors as well as with intelligent VINT Phidgets. If you are trying to use a simple device such as a slider, a 0-5V sensor, a switch, or an LED with the VINT port directly, you will want to set this property to TRUE. Otherwise this should be left as default or set to FALSE.
Set is hub port device with the IsHubPortDevice property.
Serial Number
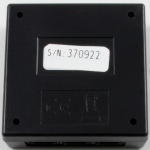
Each Phidget has a unique serial number (VINT devices inherit the serial number of the hub they're connected to). When you use more than one device with the same channel class, the device serial number must be specified to ensure the channel on the desired device is matched. The device serial number can be found on a label on the underside of the Phidget, or determined by reading the DeviceSerialNumber property.
Set the device serial number with the DeviceSerialNumber property.
Label
If you want to have a human-readable way to reference your Phidget instead of an arbitrary serial number, you can use the Label feature of Phidgets. You can call the WriteLabel method to permanently store the desired label in the Phidget's onboard flash. From then on, you can set the DeviceLabel property of a channel before opening it.
There are some limitations that will determine if you can use Labels in your project:
- You can only write labels to Phidgets that have serial numbers.
- In Windows, any label can be read, but label can only be written for newer Phidgets that support firmware upgrading.
- Some programming languages do not support writing to labels. See the Phidget22 API to see if it's supported in your language.
If you have a VINT Hub that has a label written to it, you can use the same label to address any device connected to that hub. See the User Guide for more information on using labels with the VINT Hub.
Note: You should be careful when writing labels to your Phidgets in your code, because the label is stored in flash which can only be re-written around 10,000 times before it will no longer write. If your program is complex, be sure to test it thoroughly before using WriteLabel to avoid accidentally burning out the flash.
Finding the Addressing Information
If you are ever unsure what the addressing parameters are for a given Phidget channel, the addressing parameters can be found using the Phidget Control Panel by clicking the button at the top of the Control Panel example for that Phidget.

In the Addressing Information window, the section above the line displays information you will need to connect to your Phidget from any application. In particular, note the Channel Class field as this will be the API you will need to use with your Phidget, and the type of example you should use to get started with it. The section below the line provides information about the network the Phidget is connected on if it is attached remotely. Keep track of these parameters moving forward, as you will need them once you start running our examples or your own code.

Code Samples
Here are some examples of how to address Phidgets:
Opening a Channel on a USB Phidget
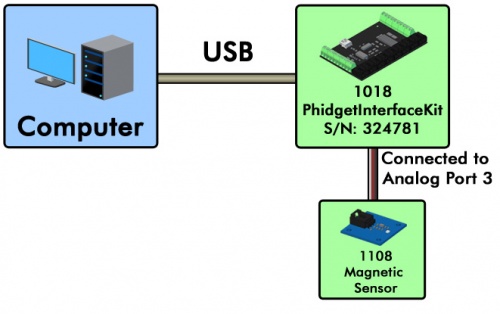
In this example, a 1018 PhidgetInterfaceKit 8/8/8 is connected to a computer. A 1108 Magnetic Sensor is connected to analog port 3 on the 1018. Here's how you would open the channel for the magnetic sensor:
ch = VoltageRatioInput()
ch.setDeviceSerialNumber(324781)
ch.setChannel(3)
ch.openWaitForAttachment(5000)
VoltageRatioInput ch = new VoltageRatioInput();
ch.setDeviceSerialNumber(324781);
ch.setChannel(3);
ch.open(5000);
VoltageRatioInput ch = new VoltageRatioInput();
ch.DeviceSerialNumber = 324781;
ch.Channel = 3;
ch.Open(5000);
PhidgetVoltageRatioInputHandle ch;
PhidgetVoltageRatioInput_create(&ch);

Phidget_setDeviceSerialNumber((PhidgetHandle)ch, 324781);
Phidget_setChannel((PhidgetHandle)ch, 3);
Phdiget_openWaitForAttachment((PhidgetHandle)ch, 5000);
var ch = new phidget22.VoltageRatioInput()
ch.setDeviceSerialNumber(324781)
ch.setChannel(3)
ch.open(5000)
If you wanted to open digital input 5 in the same example, it would look like this:
ch = DigitalInput()
ch.setDeviceSerialNumber(324781)
ch.setChannel(5)
ch.openWaitForAttachment(5000)
DigitalInput ch = new DigitalInput();
ch.setDeviceSerialNumber(324781);
ch.setChannel(5);
ch.open(5000);
DigitalInput ch = new DigitalInput();
ch.DeviceSerialNumber = 324781;
ch.Channel = 5;
ch.Open(5000);
PhidgetDigitalInputHandle ch;
PhidgetDigitalInput_create(&ch);

Phidget_setDeviceSerialNumber((PhidgetHandle)ch, 324781);
Phidget_setChannel((PhidgetHandle)ch, 5);
Phdiget_openWaitForAttachment((PhidgetHandle)ch, 5000);
var ch = new phidget22.DigitalInput()
ch.setDeviceSerialNumber(324781)
ch.setChannel(5)
ch.open(5000)
Opening a Channel on a VINT Device
In this example, we have a TMP1101 4x Thermocouple Phidget and a HUB0000 VINT Hub.
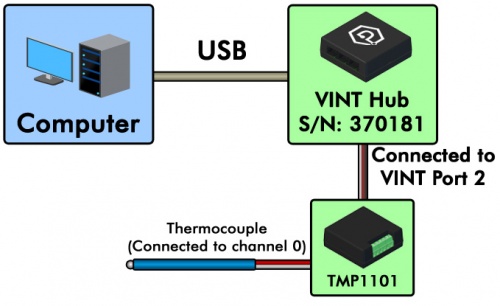
Let's say we want to open both the thermocouple connected to port 0 and the integrated temperature sensor on the board. We first need to figure out which channels those are. You can find this information on the product page for the TMP1101 and click on the API tab. From the table at the top of the tab, we can see that the integrated temperature sensor is TemperatureSensor channel 4. Opening these channels would look like this:
tc = TemperatureSensor() # Handle for the thermocouple
ic = TemperatureSensor() # Handle for the integrated temperature chip

tc.setDeviceSerialNumber(370181)
ic.setDeviceSerialNumber(370181)
tc.setHubPort(2)
ic.setHubPort(2)
tc.setChannel(0)
ic.setChannel(4)

tc.openWaitForAttachment(5000)
ic.openWaitForAttachment(5000)
TemperatureSensor tc = new TemperatureSensor(); // Handle for the thermocouple
TemperatureSensor ic = new TemperatureSensor(); // Handle for the integrated temperature chip

tc.setDeviceSerialNumber(370181);
ic.setDeviceSerialNumber(370181);
tc.setHubPort(2);
ic.setHubPort(2);
tc.setChannel(0);
ic.setChannel(4);

tc.open(5000);
ic.open(5000);
TemperatureSensor tc = new TemperatureSensor(); // Handle for the thermocouple
TemperatureSensor ic = new TemperatureSensor(); // Handle for the integrated temperature chip

tc.DeviceSerialNumber = 370181;
ic.DeviceSerialNumber = 370181;
tc.HubPort = 2;
ic.HubPort = 2;
tc.Channel = 0;
ic.Channel = 4;

tc.Open(5000);
ic.Open(5000);
Phidget_setDeviceSerialNumber((PhidgetHandle)tc, 370181); Phidget_setDeviceSerialNumber((PhidgetHandle)ic, 370181); Phidget_setHubPort((PhidgetHandle)tc, 2); Phidget_setHubPort((PhidgetHandle)ic, 2); Phidget_setChannel((PhidgetHandle)tc, 0); Phidget_setChannel((PhidgetHandle)ic, 4);
Phidget_openWaitForAttachment((PhidgetHandle)tc, 5000); Phidget_openWaitForAttachment((PhidgetHandle)ic, 5000);
var tc = new phidget22.TemperatureSensor() // Handle for the thermocouple
var ic = new phidget22.TemperatureSensor() // Handle for the integrated temperature chip

tc.setDeviceSerialNumber(370181)
ic.setDeviceSerialNumber(370181)
tc.setHubPort(2)
ic.setHubPort(2)
tc.setChannel(0)
ic.setChannel(4)

tc.open(5000)
ic.open(5000)
Opening a VINT Hub Port as a Channel
The ports on a VINT Hub can be opened as Digital Inputs, Digital Outputs, Voltage Inputs, or Voltage Ratio Inputs. Suppose you had a HUB0000 VINT Hub with a Ratiometric sensor connected to its fourth port.
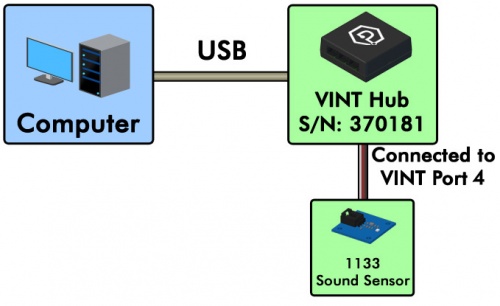
Here's how you would open it:
ch = VoltageRatioInput()
ch.setDeviceSerialNumber(370181)
ch.setIsHubPortDevice(True)
ch.setHubPort(4)
ch.openWaitForAttachment(5000)
VoltageRatioInput ch = new VoltageRatioInput();
ch.setDeviceSerialNumber(370181);
ch.setIsHubPortDevice(true);
ch.setHubPort(4);
ch.open(5000);
VoltageRatioInput ch = new VoltageRatioInput();
ch.DeviceSerialNumber = 370181;
ch.IsHubPortDevice = true;
ch.HubPort = 4;
ch.Open(5000);
PhidgetVoltageRatioInputHandle ch;
PhidgetVoltageRatioInput_create(&ch);

Phidget_setDeviceSerialNumber((PhidgetHandle)ch, 370181);
Phidget_setIsHubPortDevice((PhidgetHandle)ch, 1);
Phidget_setHubPort((PhidgetHandle)ch, 4);
Phdiget_openWaitForAttachment((PhidgetHandle)ch, 5000);
var ch = new phidget22.VoltageRatioInput()
ch.setDeviceSerialNumber(370181)
ch.setIsHubPortDevice(true)
ch.setHubPort(4)
ch.open(5000)
Opening a Channel on a Remote Phidget
Suppose you wanted to open a locally connected Phidget remotely over the Network Service, so that you could have multiple programs connecting to it at the same time. In this example, we have a 1024 PhidgetRFID connected to a computer that has the Phidget Network Server enabled.
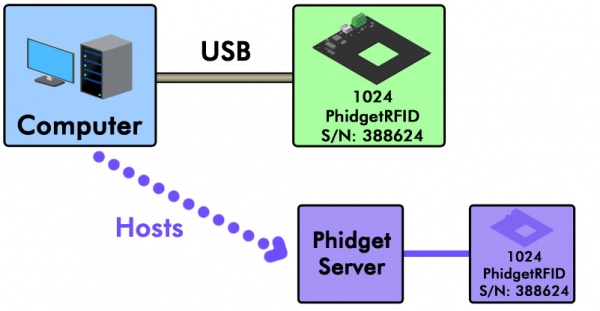
You could open the RFID reader channel remotely with the following code:
ch = new RFID();

#Enable connecting to the Phidget Network Server
Net.enableServerDiscovery(PhidgetServerType.PHIDGETSERVER_DEVICEREMOTE)

ch.setDeviceSerialNumber(388624);
ch.setIsRemote(True);
ch.openWaitForAttachment(5000);
RFID ch = new RFID();

//Enable connecting to the Phidget Network Server
Net.enableServerDiscovery(ServerType.DEVICE_REMOTE);

ch.setDeviceSerialNumber(388624);
ch.setIsRemote(true);
ch.open(5000);
RFID ch = new RFID();

//Enable connecting to the Phidget Network Server
Net.EnableServerDiscovery(ServerType.DeviceRemote);

ch.DeviceSerialNumber = 388624;
ch.IsRemote = true;
ch.Open(5000);
PhidgetRFIDHandle ch;
PhidgetRFID_create(&ch)

//Enable connecting to the Phidget Network Server
PhidgetNet_enableServerDiscovery(PHIDGETSERVER_DEVICEREMOTE);

Phidget_setDeviceSerialNumber((PhidgetHandle)ch, 388624);
Phidget_setIsRemote((PhidgetHandle)ch, 1);
Phidget_open((PhidgetHandle)ch, 5000);