1204 User Guide
Required Hardware
- A 1204 TextLCD Adapter
- A USB Cable
- A computer
- A compatible LCD screen and cable
Connecting the Pieces
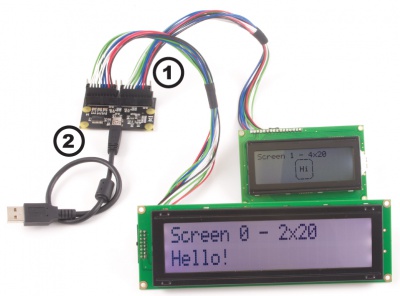
- Connect the LCD screen to the adapter using the LCD cable.
- Connect the TextLCD adapter to the computer using a USB cable.
Testing Using Windows
Phidget Control Panel
In order to demonstrate the functionality of the 1204, the Phidget Control Panel running on a Windows machine will be used.
The Phidget Control Panel is available for use on both macOS and Windows machines.
Windows
To open the Phidget Control Panel on Windows, find the ![]() icon in the taskbar. If it is not there, open up the start menu and search for Phidget Control Panel
icon in the taskbar. If it is not there, open up the start menu and search for Phidget Control Panel
macOS
To open the Phidget Control Panel on macOS, open Finder and navigate to the Phidget Control Panel in the Applications list. Double click on the ![]() icon to bring up the Phidget Control Panel.
icon to bring up the Phidget Control Panel.
For more information, take a look at the getting started guide for your operating system:
Linux users can follow the getting started with Linux guide and continue reading here for more information about the 1204.
First Look
After plugging the 1204 into your computer and opening the Phidget Control Panel, you will see something like this:
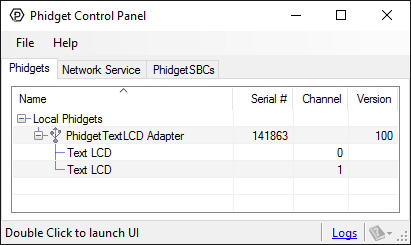
The Phidget Control Panel will list all connected Phidgets and associated objects, as well as the following information:
- Serial number: allows you to differentiate between similar Phidgets.
- Channel: allows you to differentiate between similar objects on a Phidget.
- Version number: corresponds to the firmware version your Phidget is running. If your Phidget is listed in red, your firmware is out of date. Update the firmware by double-clicking the entry.
The Phidget Control Panel can also be used to test your device. Double-clicking on an object will open an example.
Text LCD
Double-click on the LCD object, labelled {{{2}}}, in order to run the example: [[Image:{{{1}}}_TextLCD_Example.jpg|center|link=]]
General information about the selected object will be displayed at the top of the window. You can also experiment with the following functionality:
- Write in the Display text text boxes, your input will be mirrored on the LCD screen.
- Drag the Contrast and Brightness sliders to a level where you can clearly see the text on the screen.
- Toggle the Cursor and Cursor Blink checkbox to view the current cursor position on the LCD screen.
- Toggle Custom Characters to show an example of the {{{1}}} using bitmaps.
- Use the Clear button to clear the screen.
Testing Using Mac OS X
- Go to the Quick Downloads section on the Mac OS X page.
- Download and run the Phidget OS X Installer
- Click on System Preferences >> Phidgets (under Other) to activate the Preference Pane
- Make sure your device is properly attached
- Double click on your device's objects in the listing to open them. The Preference Pane and examples will function very similarly to the ones described above in the Windows section.
Testing Using Linux
For a general step-by-step guide on getting Phidgets running on Linux, see the Linux page.
Using a Remote OS
We recommend testing your Phidget on a desktop OS before moving on to remote OS. Once you've tested your Phidget, you can go to the PhidgetSBC, or iOS pages to learn how to proceed.
Technical Details
Introduction
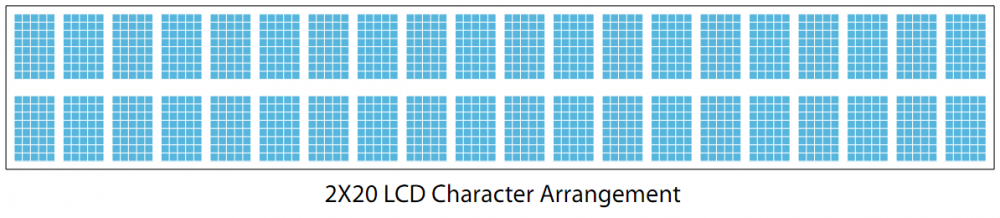
Liquid Crystal Displays are display devices used to convey information through arrangements of pixels. Graphic and Text LCDs are the most common types available for electronic products. The 1204 supports the following screen sizes (lines x characters): 1x8, 2x8, 1x16, 2x16, 4x16, 2x20, 4x20, 2x24, 1x40, 2x40, 4x40. Please note that your program has no way of automatically detecting the size of the attached screen, so you need to set the screen size with call from the API in order to have text strings display properly.
Connector
Below is a pinout diagram for the connector on the 1204, with descriptions of each pin. Remember to use the end of the cable with the larger connector with the 1204 if you want the wire colors to be consistent with the diagram.
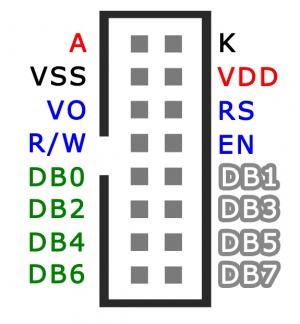
- A: LED Anode (+)
- K: LED Cathode (-)
- VSS: Board Ground
- VDD: Supply Voltage (5V)
- VO: LCD Operating Voltage
- RS: Register Selector
- R/W: Read/Write Signal
- DB0-DB7: Data Bus Lines
Text LCDs
Text LCDs display full text strings set in software. Since text characters are defined from the ASCII standard library, other ASCII standard set characters and glyphs can also be sent to the text LCD. This can be done easily by using unicode characters within your text string. In C#, this may look something like this:
tLCD.rows[0].DisplayString = "Apple starts with \u0041";
In this example, the string \u indicates that a unicode character follows, and the unicode character 0041 (which references the hexadecimal character code 0x41) represents the capital letter A. After the LCD converts the unicode character, the above example would cause the LCD screen to read Apple starts with A. A chart of all ASCII standard set character codes is available here.
Custom Characters
Custom characters can also be generated for the PhidgetTextLCD. A custom character can be any arrangement of pixels within the space allotted for a single character. Single characters are made up of pixels arranged in a grid 5 pixels wide by 8 pixels high. Once generated, custom characters can be stored in any one of eight volatile memory locations on the PhidgetTextLCD, and can be recalled with a simple API command from software. When custom characters are designed, a formula is used to change the pixel design into a pair of numerical values. The first value relates to the design of the top 4 rows of the character, and the second value relates to the design of the bottom 4 rows of the character. Unlike the unicode characters used in the Special Characters section above, the calculated number is not in hexadecimal format but is an integer value up to six characters in length. The calculation for custom characters can be done by hand, or can be completed for you by using the form available at www.phidgets.com/documentation/customchar.html. Done by hand, each integer value represents the sum of two to the power of each individual on-pixel’s location within that integer-value’s half of the character. Pixels not turned on are valued at zero. For example, a custom character happy-face with pixels 6, 8, 11 and 13 in the upper half turned on, pixels 1, 3, 6, 8, 11, 12 and 13 in the lower half turned on, and all other pixels turned off, would result in the following integer values.

These two values are then stored in one of eight memory locations (CG-RAM 0 to 7) on the PhidgetTextLCD by using the Set Custom Character method in software. In C#, this may look something like this:
tLCD.customCharacters[0].setCustomCharacter(10560, 14666)
Once stored, characters can be recalled into a text string by either using the unicode value for the location as referenced in the ASCII Chart or by using the String Code method from the API. Examples in C# of both methods are shown below:
tLCD.rows[0].DisplayString = "I am happy \u0008";
tLCD.rows[0].DisplayString = "I am happy " + tLCD.customCharacters[0].StringCode;
What to do Next
- Programming Languages - Find your preferred programming language here and learn how to write your own code with Phidgets!
- Phidget Programming Basics - Once you have set up Phidgets to work with your programming environment, we recommend you read our page on to learn the fundamentals of programming with Phidgets.