1204 User Guide: Difference between revisions
| Line 18: | Line 18: | ||
#Connect the PhidgetTextLCD Adapter to your computer using the Mini-USB cable. | #Connect the PhidgetTextLCD Adapter to your computer using the Mini-USB cable. | ||
| | | | ||
[[ | [[image:1204_0_Connecting_The_Hardware.jpg|400px|link=]] | ||
||}} | ||}} | ||
Revision as of 19:27, 20 July 2012
Getting Started
Checking the Contents
|
You should have received:
|
In order to test your new Phidget you will also need:
| |
Connecting the Pieces
|
||
Testing Using Windows 2000 / XP / Vista / 7
Make sure you have the current version of the Phidget library installed on your PC. If you don't, follow these steps:
- Go to the Quick Downloads section on the Windows page
- Download and run the Phidget21 Installer (32-bit, or 64-bit, depending on your system)
- You should see the
 icon on the right hand corner of the Task Bar.
Running Phidgets Sample Program
Double clicking on the ![]() icon loads the Phidget Control Panel; we will use this program to ensure that your new Phidget works properly.
icon loads the Phidget Control Panel; we will use this program to ensure that your new Phidget works properly.
The source code for the TextLCD-full sample program can be found in the quick downloads section on the C# Language Page. If you'd like to see examples in other languages, you can visit our Languages page.
Updating Device Firmware
If an entry in this list is red, it means the firmware for that device is out of date. Double click on the entry to be given the option of updating the firmware. If you choose not to update the firmware, you can still run the example for that device after refusing.
|
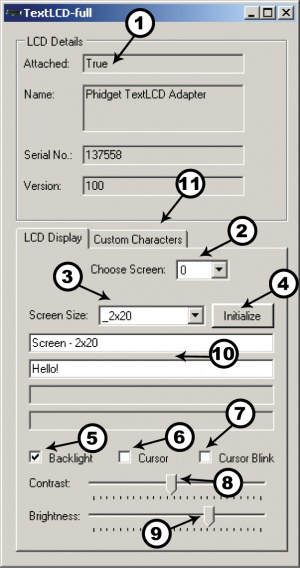
LCD Display Tab
|
| |
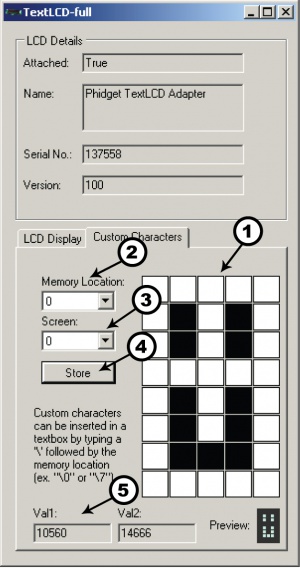
Custom Characters Tab
|
|
Testing Using Mac OS X
- Go to the Quick Downloads section on the Mac OS X page
- Download and run the Phidget OS X Installer
- Click on System Preferences >> Phidgets (under Other) to activate the Preference Pane
- Make sure that the is properly attached.
- Double Click on in the Phidget Preference Pane to bring up the Sample program. This program will function in a similar way as the Windows version.
Using Linux
For a step-by-step guide on getting Phidgets running on Linux, check the Linux page.
Using Windows Mobile / CE 5.0 / CE 6.0
Technical Details
API
Enums
enum {
- PHIDGET_TEXTLCD_SCREEN_NONE,
- PHIDGET_TEXTLCD_SCREEN_1x8,
- PHIDGET_TEXTLCD_SCREEN_2x8,
- PHIDGET_TEXTLCD_SCREEN_1x16,
- PHIDGET_TEXTLCD_SCREEN_2x16,
- PHIDGET_TEXTLCD_SCREEN_4x16,
- PHIDGET_TEXTLCD_SCREEN_2x20,
- PHIDGET_TEXTLCD_SCREEN_4x20,
- PHIDGET_TEXTLCD_SCREEN_2x24,
- PHIDGET_TEXTLCD_SCREEN_1x40,
- PHIDGET_TEXTLCD_SCREEN_2x40,
- PHIDGET_TEXTLCD_SCREEN_4x40,
} ScreenSizes This is a list of the supported screen sizes. The 4x40 screen is a special case because it requires both of the enable lines - so when it is attached, it must be setup on screen 0, and screen 1 cannot be used.
Properties
Template:UGapi Template:UGapi Template:UGapi Template:UGapi Template:UGapi Template:UGapi Template:UGapi Template:UGapi Template:UGapi Template:UGapi Template:UGapi Template:UGapi