1203 User Guide: Difference between revisions
From Phidgets Support
No edit summary |
|||
| Line 23: | Line 23: | ||
||}} | ||}} | ||
This device shows up as just a combination of a 1018 and a single port 1204. Because of this we ask that you refer to the manuals for the [[1018 User Guide|1018]] and [[1204 User Guide|1204 ]]respectively for information on the technical details and API for each half of this device. | This device shows up as just a combination of a 1018 and a single port 1204. Because of this we ask that you refer to the manuals for the [[1018 User Guide|1018]] and [[1204 User Guide|1204]] respectively for information on the technical details and API for each half of this device. | ||
==Product History== | ==Product History== | ||
Revision as of 19:49, 20 July 2012
Getting Started
Checking the Contents
|
You should have received:
|
In order to test your new Phidget you will also need:
| |
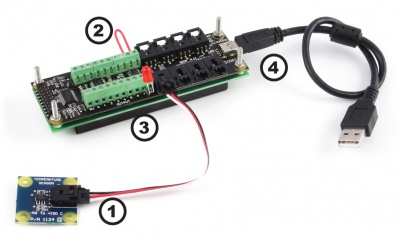
Connecting the Pieces
|
| |
This device shows up as just a combination of a 1018 and a single port 1204. Because of this we ask that you refer to the manuals for the 1018 and 1204 respectively for information on the technical details and API for each half of this device.