1101 User Guide: Difference between revisions
No edit summary |
No edit summary |
||
| Line 11: | Line 11: | ||
===Connecting the Pieces=== | ===Connecting the Pieces=== | ||
[[Image: | [[Image:1101_Connecting_The_Hardware.jpg|400px|right|link=]] | ||
# Connect the Sharp IR distance sensor to the 1101 adapter. | # Connect the Sharp IR distance sensor to the 1101 adapter. | ||
# Connect the adapter to the InterfaceKit or Hub using the sensor cable. | # Connect the adapter to the InterfaceKit or Hub using the sensor cable. | ||
Revision as of 19:52, 30 August 2016
Required Hardware
- A 1101 IR Distance Adapter
- An InterfaceKit or Hub to read the sensor
- A sensor cable
- A USB cable
- A computer
- A compatible Sharp IR distance sensor
Connecting the Pieces
- Connect the Sharp IR distance sensor to the 1101 adapter.
- Connect the adapter to the InterfaceKit or Hub using the sensor cable.
- Connect the InterfaceKit or Hub to your computer using the USB cable.
Testing Using Windows
Phidget Control Panel
In order to demonstrate the functionality of the 1018, the Phidget Control Panel running on a Windows machine will be used.
The Phidget Control Panel is available for use on both macOS and Windows machines.
Windows
To open the Phidget Control Panel on Windows, find the ![]() icon in the taskbar. If it is not there, open up the start menu and search for Phidget Control Panel
icon in the taskbar. If it is not there, open up the start menu and search for Phidget Control Panel
macOS
To open the Phidget Control Panel on macOS, open Finder and navigate to the Phidget Control Panel in the Applications list. Double click on the ![]() icon to bring up the Phidget Control Panel.
icon to bring up the Phidget Control Panel.
For more information, take a look at the getting started guide for your operating system:
Linux users can follow the getting started with Linux guide and continue reading here for more information about the 1018.
First Look
After plugging the 1018 into your computer and opening the Phidget Control Panel, you will see something like this:
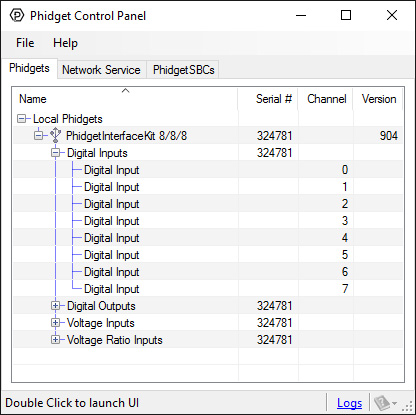
The Phidget Control Panel will list all connected Phidgets and associated objects, as well as the following information:
- Serial number: allows you to differentiate between similar Phidgets.
- Channel: allows you to differentiate between similar objects on a Phidget.
- Version number: corresponds to the firmware version your Phidget is running. If your Phidget is listed in red, your firmware is out of date. Update the firmware by double-clicking the entry.
The Phidget Control Panel can also be used to test your device. Double-clicking on an object will open an example.
Voltage Input
Double-click on a Voltage Input object in order to run the example: [[Image:{{{1}}}_VoltageInputSensor_Example.jpg|center|link=]]
General information about the selected object will be displayed at the top of the window. You can also experiment with the following functionality:
- Modify the change trigger and/or data interval value by dragging the sliders. For more information on these settings, see the data interval/change trigger page.
- If you have an analog sensor connected that you bought from us, you can select it from the Sensor Type drop-down menu. The example will then convert the voltage into a more meaningful value based on your sensor, with units included, and display it beside the Sensor Value label. Converting voltage to a Sensor Value is not specific to this example, it is handled by the Phidget libraries, with functions you have access to when you begin developing!
For more information about Voltage Inputs, check out the Voltage Input Primer.
Testing Using Mac OS X
- Go to the Quick Downloads section on the Mac OS X page.
- Download and run the Phidget OS X Installer
- Click on System Preferences >> Phidgets (under Other) to activate the Preference Pane
- Make sure your device is properly attached
- Double click on your device's objects in the listing to open them. The Preference Pane and examples will function very similarly to the ones described above in the Windows section.
Testing Using Linux
For a general step-by-step guide on getting Phidgets running on Linux, see the Linux page.
Using a Remote OS
We recommend testing your Phidget on a desktop OS before moving on to remote OS. Once you've tested your Phidget, you can go to the PhidgetSBC, or iOS pages to learn how to proceed.
Technical Details
The function of the IR Distance Adapter Board is to regulate the power requirement of the connected sensor. Although the specified current consumption may be low for these types of sensors, they may draw much more current for short periods of time during measurements. If two or more of these sensors are directly connected to the analog inputs of a PhidgetInterfaceKit, (which can source a maximum of 500mA current total) then the InterfaceKit may potentially experience an overload. Up to eight Sharp IR Distance sensors can safely be connected to the PhidgetInterfaceKit 8/8/8 at the same time through IR Distance Adapter Boards, which prevents the possibility of overcurrent.
Sharp IR distance sensors are recommended for use with the IR Distance Adapter board. The sensor values given will be outside the specified range when no object is present, and fall between a specific range when an object isdetected. For analog type sensors, the output is roughly inversely proportional to the distance between the specific range. For digital type sensors, output below a certain value can be treated as a detection.
Make sure that the distance of the object being measured is within the distance range of the sensor. When the object is outside the valid sensor’s distance range, the returned value should be discarded. You must be especially careful when the object is closer than it should be, as the returned value might be within the SensorValue range but is not meaningful. If the sensor is being used outdoors, be mindful that sunlight can cause interference, especially when the sunlight is entering at such an angle that it is within the sensor's cone of detection. The IR light from these sensors can pass through glass, but only if the glass is completely clear and the sensor is perpendicular and very close to the surface of the glass. Otherwise, too much IR light will be reflected for the sensor to work properly.
Formulas
These formulas are derived from the Sharp datasheets to compute distance and are only valid for the Sharp Distance Sensors that we stock and sell on Phidgets.com.
- 3520 - Sharp Distance Sensor 2D120X (4-30cm)
- 3521 - Sharp Distance Sensor 2Y0A21 (10-80cm)
- 3522 - Sharp Distance Sensor 2Y0A02 (20-150cm)
The formula to translate SensorValue into Distance for Sharp 4-30cm analog sensor is:
- Distance (cm) = 2076/(SensorValue - 11)
- This formula is only valid over the SensorValue range 80-530.
The formula to translate SensorValue into Distance for Sharp 10-80cm analog sensors is:
- Distance (cm) = 4800/(SensorValue - 20)
- This formula is only valid over the SensorValue range 80-500.
The formula to translate SensorValue into Distance for Sharp 20-150cm analog sensors is:
- Distance (cm) = 9462/(SensorValue - 16.92)
- This formula is only valid over the SensorValue range 80-490.
For digital distance sensors, SensorValue will be greater than 200 if the distance of the object being measured is less that the detection distance of the sensor. Otherwise the SensorValue will be less that 200.
Note: The output of this sensor will vary from unit to unit, and based on the characteristics of the target (reflectance, size, direction of motion, object alignment, etc). Our formula is based on the data provided by Sharp. If you find that you are not getting good results with the standard formulas, you may want to derive your ownformula to better characterize your situation.
Compatible Infrared Sensors
The following is a list of distance sensors that are known to work with the IR Distance Adapter Board. If the product is not listed here, it can be assumed to be incompatible.
| Manufacturer | Part Number | Description |
|---|---|---|
| Sharp | GP2Y0A02YK0F | 20-150cm Analog |
| Sharp | GP2Y0A02YK | 20-150cm Analog (non-RoHS) |
| Sharp | GP2Y0D21YK0F | 24cm Digital |
| Sharp | GP2Y0D21YK | 24cm Digital (non-RoHS) |
| Sharp | GP2D14J0000F | 24cm Digital |
| Sharp | GP2D15 | 24cm Digital (non-RoHS) |
| Sharp | GP2Y0D02YK0F | 80cm Digital |
| Sharp | GP2Y0D02YK | 80cm Digital (non-RoHS) |
| Sharp | GP2D150AJ00F | 15cm Digital |
| Sharp | GP2D140A | 15cm Digital (non-RoHS) |
| Sharp | GP2Y0A21YK0F | 10-80cm Analog |
| Sharp | GP2D12 | 10-80cm Analog (non-RoHS) |
| Sharp | GP2Y0A21YK | 10-80cm Analog (non-RoHS) |
| Sharp | GP2D120XJ00F | 4-30cm Analog |
| Sharp | GP2D120 | 4-30cm Analog (non-RoHS) |
Phidget Cable
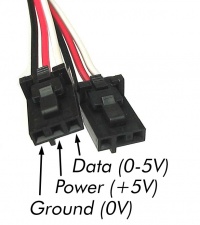
The Phidget Cable is a 3-pin, 0.100 inch pitch locking connector. Pictured here is a plug with the connections labelled. The connectors are commonly available - refer to the Analog Input Primer for manufacturer part numbers.
What to do Next
- Programming Languages - Find your preferred programming language here and learn how to write your own code with Phidgets!
- Phidget Programming Basics - Once you have set up Phidgets to work with your programming environment, we recommend you read our page on to learn the fundamentals of programming with Phidgets.