1072 User Guide
Getting Started
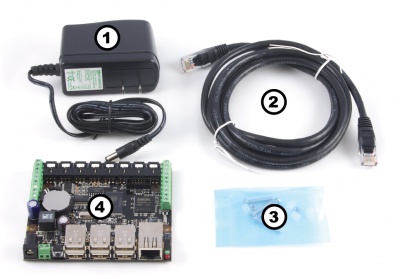
Checking the Contents
|
You should have received:
In order to test your new Phidget you will also need:
|
| |
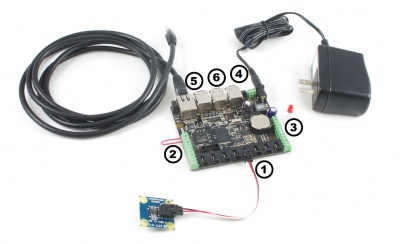
Connecting the Pieces
|
| |
Testing Using Windows 2000 / XP / Vista / 7
Make sure you have the current version of the Phidget library installed on your PC. If you don't, follow these steps:
- Go to the Quick Downloads section on the Windows page
- Download and run the Phidget21 Installer (32-bit, or 64-bit, depending on your system)
- You should see the
 icon on the right hand corner of the Task Bar.
Running Phidgets Sample Program
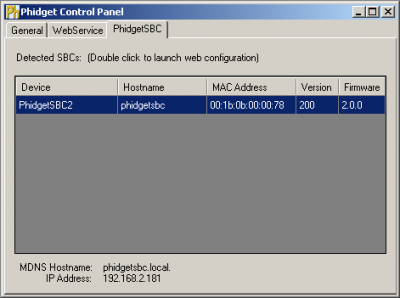
Double clicking on the ![]() icon loads Phidget Control Panel; we will use this program to ensure that your new Phidget works properly.
icon loads Phidget Control Panel; we will use this program to ensure that your new Phidget works properly.
This control panel view will tell you (at the bottom):
You will need one of these two pieces of information when you start working directly with the SBC Operating System for tasks such as writing and running code on the SBC, so write these down somewhere while you work through the rest of this Getting Started page.
|
| |
Basic Use
Basic use of the PhidgetSBC allows the opening of connected Phidgets over the network. Using another Phidget with the PhidgetSBC in this way is almost exactly like using Phidgets over USB, in respect to the API calls and behavior. However, some extra considerations need to be made when working with the PhidgetWebservice.
Phidget Webservice
Support for opening Phidgets over the network is made possible via the Phidget Webservice. This allows a user to write an application in a system and language of their choosing and then operate Phidgets connected to the PhidgetSBC. It is a socket based server that runs on the PhidgetSBC at all times (unless disabled), and allows any attached Phidgets to be seen and opened directly over the network.
Opening and controlling a Phidget over the network is nearly the same as opening one locally. The main differences are:
- Different open calls that include server information. New calls OpenRemote and openRemoteIP (naming depends on language).
- Access to Webservice based properties: Server hostname, port and ID.
- Access to server connect and disconnect events, and network error events.
- Phidgets can be opened by more then one separate application at the same time.
- Reliability is more of a issue because network connections are easily broken
Opening a Phidget over the network is asynchronous and pervasive, just like opening locally. This means that if a connection to the remote server cannot be established right away, it will keep trying indefinitely, and even survive the server being stopped and started, etc. Instances of the Phidget Webservice can be referred to either using hostname (IP Address) and port number, or by Server ID. The advantage of using a Server ID is that it stays consistent compared to IP addresses, and you don’t need to know the Port number. A Webservice Server ID is assigned when the Webservice is run - which on the PhidgetSBC defaults to ‘phidgetsbc’. In order to use a Server ID, the Bonjour utility also needs to be installed. Refer to the Programming Manual and the API manual for your language for more information about using the Phidget Webservice.
Reliability
Determining reliability needs can become important while opening Phidgets over the network, because the network connection can potentially be interrupted at any time. This can leave the network attached Phidget in an undesirable state. For example - if a motor controller is driving a motor and the connection is lost, there is no way to stop the motor until the connection is re-established. These issues are less important if you are just receiving sensor data from an Interface Kit.
It’s generally a good idea to catch server connect and disconnect and Phidget attach and detach events in order to know the state of the connections. It’s also a good idea to catch error events - this is where network errors will be reported. If reliability is important, you should consider writing a program to run locally on the PhidgetSBC, and communicate with it through the Dictionary interface. This way, if the connection is broken, the local application will notice and be able to take any appropriate actions. See the advanced chapter for more information.
Finding Phidgets on the Network
Any Phidgets attached to the PhidgetSBC can be identified using the Status >> Phidgets page in the configuration interface, and should be seen on the network through the Webservice. The Phidget Control Panel has a Bonjour tab (under WebService >> Bonjour) that lists all detected network attached Phidgets. The Phidgets connected to the PhidgetSBC should be seen here and can be opened by double clicking its name in the menu. Network attached Phidgets can also be located programmatically with the Phidget Manager. The Phidget Manager is used with either hostname and port, or server ID, just like with ‘Open’. The manager can also be used to find all Phidgets on any Webservice through Bonjour, by specifying a NULL Server ID. See your specific language’s guide for more information about coding with the Phidget Manager.
Configuration
The PhidgetSBC is configured through a built-in configuration interface, through an internet browser much like your wireless access point or router. You can double click on the device under the PhidgetSBC tab in the Phidget Control Panel to bring up its configuration interface. Alternatively, if you have Bonjour installed, you can access the PhidgetSBC by name. For example, by default you can use ‘http://phidgetsbc.local.’. Once you know the IP address of your PhidgetSBC, you can also just type it into your web browser of choice.
The first time you access the configuration page, the system will prompt you to set a password shared by the ‘root’and ‘user’ accounts before you can continue. This is to maintain security, and cannot be left blank. After setting a password, you can log onto the configuration page with user name ‘root’ and the password you chose. From here you have the option to view the system information and status, configure network settings, start the ssh server, set up custom applications and manage files, or view connected webcams. A breakdown of each function is provided in this manual. At this point you may also want to update the firmware and then configure the network settings if the default settings are not appropriate.
The Configuration Page
On loading the interface, you will see a tool bar along the top and bottom of the page. It holds some information across all the configuration pages. The information is as follows:
Host Name - The host name given to the PhidgetSBC on the network.
Uptime - Total time elapsed since the last reboot.
Load - The average CPU utilization in the last minute, 5 minute, and 10 minute durations.
Version - The current board and firmware version.
Save Changes - This button appears on screens which have modifiable fields. Clicking save does not cause immediate changes, but instead adds them to a pending changes list which can be reviewed and committed later.
Commit Changes - This button only appears if there are entries in the pending changes list. Clicking it will cause all entries in the list to be committed and take immediate effect.
Clear Changes - Here, we can clear the pending changes list without applying them. This button only appears if there are entries in the pending changes list.
Review Changes - This button only appears if there are entries in the pending changes list. Click to see a list of all pending changes before they’re made.
Main: PhidgetSBC Info
This is the first page you should see after loading the configuration Interface. It contains version information for the PhidgetSBC, as well as the MAC address and time.
Board Name - Name of the device. It should always read “PhidgetSBC”.
Board Revision - Board revision number. This tracks the hardware design.
Firmware Version - The version of firmware currently being used. Use this number to check if you are up to date.
Kernel Version - The type and version of the loaded operating system.
Phidget Library - The version of the installed Phidget21 library. These libraries are included with the firmware, and needs to be updated to use newly released Phidgets.
Current Date/Time - Current date and time.
MAC Address - A PhidgetSBC is uniquely identified by its MAC address shown here. This address is also printed on the label of the underside of the PhidgetSBC. Other Phidgets, including the integrated InterfaceKit, use a serial number to identify themselves.
Main: About
The license information and credits for the configuration interface is displayed here. A link is provided to the original source and the Phidgets web site.
Status: General
General network and memory status information for the system can be viewed on this page. Modifying these values are done on other pages.
Adapter - Abbreviated name and number of the network interface.
Type - Wired or wireless connection.1070_0_Product_Manual - October 28, 2010 8:52 AM 19
Mode - Network protocol used.
IP Address - The IP address of the network interface.
Subnet Mask - The subnet mask of the network interface.
Gateway - The IP address of your gateway.
MAC Address - A PhidgetSBC is identified uniquely by its MAC address. This is printed on the label of the underside of the PhidgetSBC, and also appears on this information page.
Wireless State -
Wireless SSID - The plaintext name of the wireless connection access point.
Wireless Security - Security protocol used for a wireless link.
DNS Server(s) - List of system DNS servers.
Root - The root partition is how much flash memory in bytes is for the operating system. The memory is read-only to the user and it is where the standard operating system is installed.
Userspace - The Userspace value is how much flash memory in bytes is available to use for programs, code development, and files uploaded by the user. Configuration data is also saved here.
Total - Total random access memory (RAM) in bytes.
Available - Available RAM in byte.
Status: Phidgets
The version of the installed Phidget21 library. These libraries are included and are updated along with the firmware.
A list of all detected Phidgets connected to the PhidgetSBC. It includes the integrated PhidgetInterfaceKit and displays both the serial number and version.
Status: Processes
This lists all running processes, along with their Process ID (PID), User, State and memory usage. Advanced users can use this to tell if any application is using too much memory, or has crashed. The information is gathered from the PhidgetSBC and may take several moments to load.
Status: USB
This lists all USB devices. The S3C24XX OHCI Host Controller, the TUSB2046 Hub and the built in Interface Kit 8/8/8 should always be listed, along with any connected devices. Also listed are any mounted USB drives.
A list of all the USB devices present in the system. This includes the main USB, the built in 4 port hub, and all Phidget and non-Phidget devices.
The simplest way to add additional storage is use a USB flash memory stick. This area lists of all the USB based drives connected to the PhidgetSBC, and their mount point which can be accessed through SSH. USB drives are automatically mounted at /media/usb(0-9) when attached.
Unmount - Use this button before removing the device to safely disconnect it.
Network: Network
Here is where general network settings are set up. Here you can set automatic or manual configuration, change DNS settings and enable or disable the SSH server for remote operating system access. Please refer to the Networking Guide in this manual for more information on using the network settings, and the Advanced User’s Guide for information on configuring SSH.
TCP/IP settings - DHCP will set the system IP Address, Subnet Mask, and Gateway automatically. In the absence of a DHCP server, Static should be used and filled in manually.Note that the same TCP/IP settings will be used at allaccess points.
DNS settings - DNS can be set up automatically if DHCP is enabled. Under manual settings, up to two DNS servers can be specified. Note that DNS settings are system-wide and will apply to all interfaces.
SSH Server - This is where the SSH server can be enabled or disabled. Enabling SSH for the first time can take several minutes as the keys are generated.
Network Webservice
The Phidget webservice is a simple server that allows Phidgets connected to the PhidgetSBC board to be opened over the network. This is enabled by default and starts with the SBC. The webservice also exposes a key-value dictionary which can optionally be used for communication between applications written for the PhidgetSBC, and applications running on your local computer. This page lets you view and modify its settings. Please see the Advanced User’s Guide for more information on programming with the dictionary.
Enabled/Disabled - Enables or disables the Phidget Webservice.
Server ID - Server ID is used when opening a connection to the PhidgetSBC using the mDNS based openRemote calls. This is by default the same as the PhidgetSBC hostname (phidgetsbc), but can be set to anything (up to 63 characters).
Port - Port is the port that the webservice runs on - default is 5001.
Password - The password is used for securing the webservice. By default, this option is disabled with a blank password. Note that while the authentication protocol and password is encrypted during authentication, all following data is sent in the clear.
Stop - Use this button to deactivate/reactivate the webservice
Network: Wireless
Wireless networking is supported via a USB wifi adapter. When an adapter is plugged in, this wireless configuration page will be available. Wireless networks are joined based on a list of saved networks. You can join, manually enable and disable, as well as delete these saved networks. To add a wireless network to this list, either choose from the list of detected networks, or enter the details manually. Supported security includes WEP, WPA(2) Personal and WPA(2) Enterprise. Saved networks will be joined first based on security and secondly based on best signal strength.
SSID - The SSID of the access point that you wish to add. This is the plaintext name of the access point.
Security - The security system used by this access point.
Remember this network - If enabled, this network will be added to the list of saved networks permanently, and will be available to be automatically joined in the future. Otherwise, this network will remain in the list of saved networks until the board is reset, or another network is added.
Join This Network - Joining a specific network will temporarily disable all other saved networks, so that the specific
network will be joined, if available. The other networks will remain disabled until the board is reset, or another network is added. Delete This Network - Delete a saved network. There is no confirmation and this cannot be undone.
Enable / Disable - Selected networks that are enabled will be joined automatically. Disabled networks will never be joined
TCP/IP settings - DHCP will set the system IP Address, Subnet Mask, and Gateway automatically. In the absence of a DHCP server, Static should be used and filled in manually.Note that the same TCP/IP settings will be used at all access points.
DNS settings - Switch the DNS settings between Automatic and Manual. DNS can be set up automatically if DHCP is enabled. Otherwise, up to two DNS servers can be specified. Note that DNS settings are system-wide and will apply to all interfaces.
Userspace: Userspace Browser
The userspace browser gives access to download, upload, delete and edit for files in the home directory (/home/user) of the user ‘user’. This is the ideal location for storing any arbitrary files or data, and is the recommended location of your C code projects on the PhidgetSBC. If you wish to remove files or folders, simply click the red ‘X’ beside their name in the Filesystem Browser. The system will then ask you if you are sure you want to delete the file; click OK to confirm.
Upload a file - Use Browse to select the file from your PC, or type the file path of the item to be uploaded. The Upload button will then copy the selected file to the current open folder in the Filesystem Browser.
Create a directory - Type the directory name you wish to create in the field. Click Create to make the directory in the current open folder.
Free space remaining on userspace partition - The amount of free space remaining on the user partition in bytes.
Userspace: Applications
This is where user applications are set up. Custom applications can be written in either C or Java, and then set up to run on the PhidgetSBC at system startup. On the main page, there is a list of installed applications as well as the controls for creating a new application space. Application names should not contain spaces. On a specific application space page, there are controls to start and stop the program, as well as view the stdout and stderr from the most recent (or current) run. There is a filesystem browser, which allows viewing, editing and removal of application files, as well as the ability to upload new files. File upload size is limited to 1MB per file. Note that the entire space for user applications is 5MB or less.1070_0_Product_Manual - October 28, 2010 8:52 AM 22 The application settings section configures the application. When an application is enabled, it will start at the end of the system boot process (after things like bringing up the network, starting the Phidget Webservice, etc.). The startup order field specifies a start order among the custom applications, with lower numbers being started first. The Run as Daemon check box ensures that the application is run as a daemon. This should only be unchecked if the application daemonizes itself - otherwise it will stall the boot process. Executable name is the name of the file to execute. If this filename ends in ‘.class’ or ‘.jar’, the program will be run as a Java program, otherwise it is run as an ARM Binary. See the chapter on Advanced use for more information about setting up custom applications in Java and C.
Currently installed applications - This is a list of all created applications and their current status. Enabled applications will try to run on system boot, and the stopped/running status indicates if the program is currently executing. Delete applications using the red ‘X’ near their name. You can click on the application name to launch the application page.
Create new app - This button creates a new application space using the input field for its name.
Free space remaining on userspace partition - The amount of free space remaining on the user partition in bytes.
Start/Stop - This button is for starting or stopping the execution of the program specified under application settings. Starting a program will generate stdout and stderr logs.
View stdout - You can view the standard console output of your program through this link.
View stderr - In the event of an error that halts program execution, its corresponding error message is printed here
Upload a file - Use Browse to select the file from your PC, or type the file path of the item to be uploaded. The Upload button will then copy the selected file to the current open folder in the Filesystem Browser.
Create a directory - Type the directory name you wish to create in the field. Click Create to make the directory in the current open folder.
Free space remaining on userspace partition - The amount of free space remaining on the user partition in bytes.
Enabled/Disabled - Enabled applications will start automatically when the PhidgetSBC is booted. Disabled applications can be started manually by the user.
Startup order - Use to set the startup order when multiple applications are defined. Lower numbers get started first.
Run as daemon - Runs the application as a daemon. This should only be disabled if the application daemonizes itself - otherwise the PhidgetSBC startup proccess will hang.
Executable/Class name - Name of the program file to execute. This file must exist (have been uploaded) before it gets defined here. Files ending in .class and .jar will be run through the Java VM, otherwise they are executed directly.
Arguments - Command line argument list to pass to the program on execution
Webcam: Webcam
|
This is where you can view and control any connected UVC (USB Video Class) webcams. For a list of UVC compliant webcams see here: http://linux-uvc.berlios.de/#devices Video is streamed from these devices in M-JPEG format, and can be view though the web interface, or any compatible M-JPEG viewer (such as VLC). Webcams that support pan/tilt can be controlled via the web interface. Multiple frame rates and resolutions are supported. To get started, plug in the webcam and the interface will be initialized. If the video stream is to be exported over the internet, it is recommended that the password be enabled. However, it must be noted that this is a simple HTTP authentication, which is sent unencrypted, and thus not highly secure. If prompted for the webcam password, the username is ‘webcam’. |

| |
Enabled/Disabled - Enable or disable the webcam streaming video. Video streaming can consume a lot of bandwidth depending on the settings used.
Resolution - The resolution of the capture in pixels. Only resolutions supported by the webcam are listed.
Framerate - The transmission frame rate of the capture. Available frame rates will depend on the selected resolution.
Port - The port that the video stream is sent to.
Password - Protect the webcam stream with a password. This will add a simple username and password prompt whenever you view the webcam stream - including on this page. The username is ‘webcam’. Set to nothing to disable passwords.
System: Settings
This is where general system setting are set up. Time settings is where the timezone gets set up. By default, the PhidgetSBC ships with it’s timezone set to UTC, which is GMT. In order to display the time properly, with daylight savings support, choose the time zone from the list that matches your location, or define a custom Posix TX string for your location. It should be noted that the PhidgetSBC does not maintain an accurate time without a network connection. See http://www.opengroup.org/onlinepubs/000095399/basedefs/xbd_chap08.html#tag_08_03 for more information about the TZ string.
Host name - The system hostname. This is used for the system’s mDNS hostname, as well as the Phidget Webservice default Server ID. All PhidgetSBCs have a default hostname of ‘phidgetsbc'
Timezone - Set up your time zone according to the nearest city of your region from the predefined list, or select your time zone for North America.
Zoneinfo String - Standard zoneinfo names are defined for different areas of the world.
POSIX TZ String - This is a Posix standard for specifying the time zone. The format is: stdoffset[dst[offset][,start[/time],end[/time]]]
System: Logs
This is where the kernel and system logs can be viewed. This also includes the ability to filter the text.
Text to Filter - Insert a string that covers what you would like to see or exclude. In fact you can use the regular expression constants like: 00:[[:digit:]]{2}:[[:digit:]]{2} or .debug|.err.
Filter Mode - You will see only messages containing the text in the Include mode while you will not see them in the Exclude mode.
Remove Filter - Clears the filter being used
Filter Messages - Change the filter being used. Including a blank Text to Filter effectively removes the filte
System: Password Change
This is where the system password can be changed. The system password is the ‘root’ user password, used for logging into this web interface, as well as logging in as root via SSH. This password is not used by the restricted ‘user’ account. Changes here made will take effect immediately after being saved, without asking for confirmation. The new password must consist of alphanumeric characters and be at least 1 character long.
New Password - The first field for a new password.
Confirm Password - The second field for a new password. This must match the first field.
Set Password - This button will commit the changes to your password.
System: Backup & Restore
This is where the system can be backed up to disk and restored.
You have the option to backup the configuration data only, or backup everything. Configuration data includes things like network setup, passwords, time settings, etc. Backing up everything will add to that any custom applications, and the user and root home directories (basically the entire userspace partition). The everything backup does not backup the root filesystem or kernel. When restoring from a backup file, the system will check that it is a valid backup before asking the user to continue.
Backup Configuration/Everything - Configuration backup backs up all configuration files. This includes network, passwords, system settings, etc. Everything backup backs up the configuration data as well as user applications and the user and root home directories.
Name this configuration - You can give the backup file an arbitrary name. The name is only shown during restore.
Backup - This button creates the backup. A download link to the backup will be provided and you will be prompted to save the file to a location. The download link is not valid indefinitely.
Saved backup file - Choose a backup file for this machine type. The restore system will check the file and ask for confirmation before running the restore.
Restore - This button applies the backup. The backup file will then be verified. Clicking restore again will commit the changes and take effect immediately.
Reset - This will clear the entire userspace. The system will ask for confirmation before resetting.
System: Upgrade
This is where system upgrades are performed. From time to time, upgrades will be made available. These will address bugs and security issues, add new features, and update the phidget21 library and webservice. Upgrades should never be performed over Wireless for stability reasons, so make sure that the PhidgetSBC is connected to the network with an Ethernet cable. There will be two types of firmware upgrades to choose from. The minimal firmware contains all of the features of the full install, including Phidget drivers, with the exception of custom application support (C development tools, Java VM and classes, GDB debugger). The minimal firmware is about 10 times smaller the the full install, so if you don’t use custom applications, it will be much quicker to download and install. Upgrades can be performed in two ways: The easiest is to use ‘Download from Phidget Inc.’ In this mode, the PhidgetSBC will connect to Phidgets Inc., and download the selected firmware file itself. These will be a dropdown list of available firmware files to choose from. This method requires that the PhidgetSBC have a high speed connection to the Internet. The other method is file upload, which involves downloading the firmware from the website ahead of time. If you have a low speed internet connection, or the PhidgetSBC is not connected to the internet, then this method will be recommended. If the ‘Erase Userspace partition’ option is selected, all custom applications and board configuration will be lost. The board will reboot with the new firmware ‘factory fresh’.
Erase Userspace partition and configuration data - Deletes all user data after the upgrade.
Method - ‘Download from Phidgets Inc.’ will download the latest firmware from Phidgets and install it automatically. File upload is used for firmware files downloaded ahead of time. USB drive will appear if the PhidgetSBC detects firmware on a connected flash drive.
Firmware - If Download is selected, then it will give the choice between partial or full. Otherwise, it will ask for the location of the firmware in a manual upgrade.
Upgrade - This button confirms your choice of upgrades. Once clicked, the PhidgetSBC will shut down some of its functionality and navigating away from this page will not interrupt the upgrade
System: Reboot
The board can be rebooted remotely from this page. The reboot should take 45-60 seconds depending on network conditions. It tries to shut down all running programs before restarting as opposed to the reset button.
Yes, really reboot now - This button will start the PhidgetSBC reboot sequence.
Testing Using Mac OS X
The steps are very similar to the Windows process described above:
- Ensure you have OS X 10.3.9 or later running.
- Download and run the Installer (OS software license)
- Click on System Preferences → Phidgets (under Other) to activate the Preference Pane
- Make sure that the Phidget SBC is properly attached to the network as described in the hardware section
- Double Click on the Phidget SBC in the Phidget Preference Pane to bring up the Web Interface in your default browser
- Or, click on the Bonjour tab to see attached Phidgets being run over the network and to bring up their examples
The address in the browser that connects to the SBC is either an IP address (such as 192.168.2.181) or a link local address, (such as phidgetsbc.local, which is the default). Note down the address in the browser, as you will need this information for later if you will be working directly with the SBC to perform tasks such as writing or running code. But for now, with the web interface open, we have a section to walk you through it.
Using Linux
With Linux, you have many setup options, but all involve knowing the IP address or link local address of the SBC after you have plugged it in as described in the hardware section. The IP address can be somewhat difficult to obtain, but the default link local address for all new Phidget SBCs is phidgetsbc.local - which is an mDNS address. Wait at least three minutes after booting the SBC to make sure link local addressing is started. You'll also need some form of mDNS (either avahi or mDNSResponder) installed on your main computer. The avahi service is usually installed by default on most Linux machines, try which avahi-resolve to make sure. Then, try typing phidgetsbc.local into a web browser. The web interface should come up, starting with the Set the Password screen.
Note that some browsers (i.e. Google Chrome) combine search and addressing in the same address bar, so you may need to turn off web service and prediction service in Preferences → Under The Bonnet for Chrome to treat phidgetsbc.local like a web address rather than a search term. If these steps do not bring you to the initial setup password screen as shown in the SBC Web Interface section, you will probably need to read the internet setup section on the SBC OS Page. That section contains more than just troubleshooting information - it includes in-depth information on how the SBC starts its network, your initial network configuration options, and how to connect to the SBC without mDNS using both DHCP and static IP.
If you want to use the SBC to broadcast data from Phidgets over a network, the SBC is already automatically performing this function with its attached Interface Kit, and will also do so for any Phidgets plugged into its USB ports. If this is your sole intended use of the SBC, you can skip ahead to our example on using the attached Interface Kit.
However, the SBC is much, much more than simply a way to get data from Phidgets over a network. You can use the SBC as an external Linux computer. You'll need to set a password using the SBC web interface, and write down a network address of the SBC (phidgetsbc.local, or an IP address if you worked through the internet setup section on the SBC OS Page). But after that, if no other sections in the basic SBC web interface section apply to you (using the webcam, setting up wireless networking, or checking system parameters like memory), you can skip ahead to the OS - Phidget SBC page.
Linux - Attached Interface Kit
As soon as the SBC boots and can connect to the network (either by DHCP or by mDNS/avahi), it begins broadcasting the state of its attached InterfaceKit over the network using the Phidget WebService. To test the InterfaceKit on your Linux computer over the network, you will need to install the Phidget libraries and the Phidget webservice if you haven't already. (If you have used any Phidget via USB and over a network on your Linux computer, you have already done this.) This process is described on the general Linux OS page, so follow those installation instructions, with the following modifications to the Linux webservice introduction:
- Instead of using a localhost (127.0.0.1) address, use the the SBC's IP or link local (
phidgetsbc) address, - Instead of using the function call
openRemoteIPin your code, use the function callopenRemote, and the Interface Kit serial number which is on the back of the SBC.
Note that any attached analog sensors in the black ports will not show up over the webservice as individual Phidgets. Rather, they will show up as part of the Interface Kit, through the port number that they are attached to on the SBC board.
Using Windows Mobile / CE 5.0 / CE 6.0
SBC Web Interface
Using the operating system sections of this guide, you should have been able to open a web browser with a connection to the SBC using either:
- The Phidget Control Panel (Windows), or
- The Phidget Preference Pane (Mac OS), or
- An mDNS connection (Linux).
Here we cover the basics on the tool that has been opened in the browser, known as the SBC Web Interface.
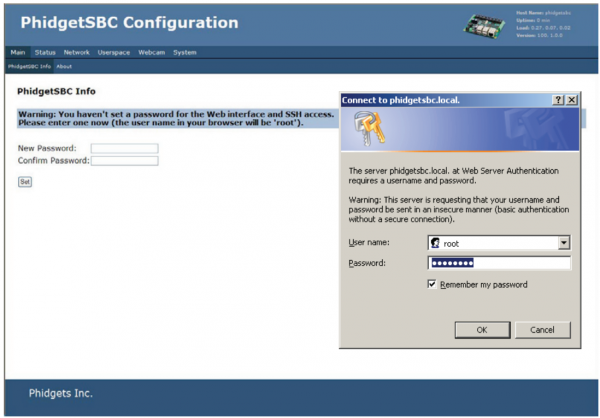
Set the Password
If this is your first time connecting to the SBC (or after a complete factory reset), you will see a screen asking you to set a password:
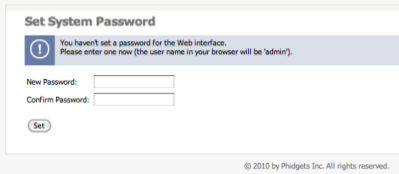
This password will be linked to the user admin if you use the web interface in the future, and to the user root if you choose to use SSH. These are actually the same user, and the SSH connection is covered in-depth on the SBC operating system page.
Remember this password, as you will need it to connect to the SBC in the future, and the only way to log in if you lose it is to perform a full factory reset on the SBC.
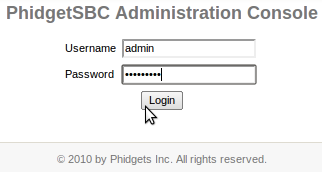
The next time you connect to the SBC after you log out or reboot the SBC, you will be asked to log in with a user name and password:
The SBC Web Interface has a series of tabs and sub-tabs at the top, and by using these you can access the entire web interface. Note that the web interface only allows you to configure a very small portion of the SBC, please refer to the full OS - Phidget SBC page for an in-depth introduction on the SBC Linux operating system.
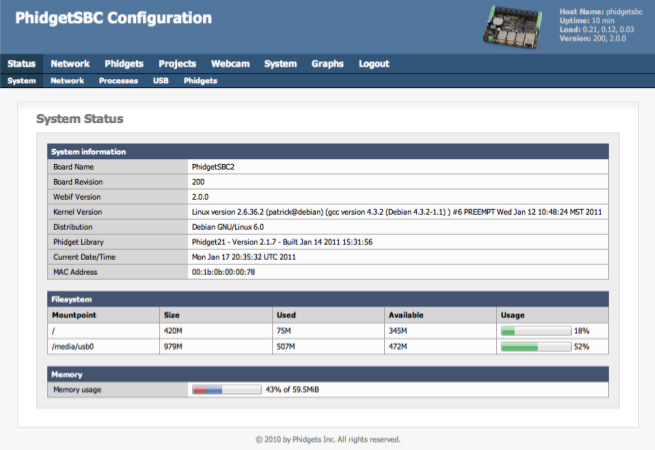
The header also has information about how long the SBC had been powered on without a reboot, what the link local address of the SBC is (here it is phidgetsbc, so the full link local address is phidgetsbc.local) and more:

The starting page of the web interface will also give you information about:
- The name of the SBC (you can rename it under
System → General, although note that this will also change the link local address of the SBC to that name) - The build, kernel, and board revision
- The MAC address (of the Ethernet connection...the wireless MAC address can be found on
Network → Statuswhen the adapter is plugged in) - The space left in your / filesystem (the amount of space you have for programs, and files not written to an external USB key)
- Any additionally mounted filesystems (such as a USB data key)
- The amount of memory your SBC is currently using
This can also be accessed later from Status → System:
Set up Networking
After using the initial wired Ethernet connection (as described in detail in the hardware section) to access the web interface for the first time, you can use the Network tab in the web interface to configure other network settings for use.
The SBC can switch dynamically between Ethernet (what it tries first) and wireless via the Wi-Fi USB Adapter w/SMA Antenna. It is also able to dynamically handle both Ethernet and wireless being unplugged and then plugged back in. This is especially useful if you are designing a project where the SBC will operate without a network - when testing you can plug in and remove the network adapters to check on how the SBC is doing.
Wireless
The SBC can only access wireless networks using the Wi-Fi USB Adapter w/SMA Antenna. If this WiFi adapter is plugged in to a USB port on the SBC, you will see something like this under Network → Wireless in the web interface:
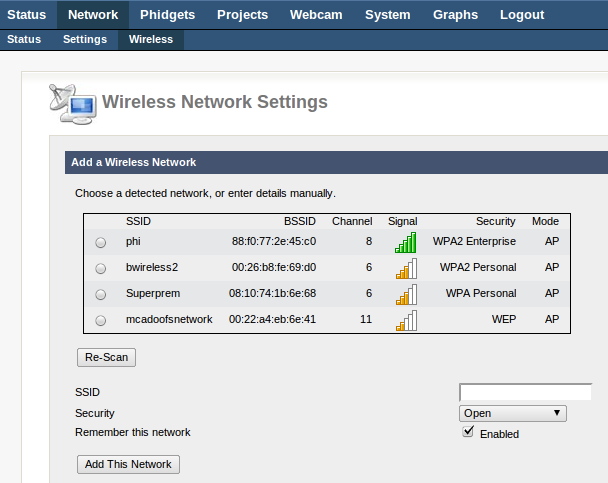
Here you can add and remember networks with passwords. These do not necessarily have to be networks that are currently seen - you can add the SSID and password of your home network, for example, and the next time the SBC boots at home with wireless only it will connect to your home wireless network. These SSID settings are only for DHCP networks.
Static IP
If you do not have DHCP on your main network, and do not want to use link local addressing, you can set the network connection to be static. These settings can be found in the web interface under Network → Settings for the Ethernet interface, and at the bottom of Network → Wireless for wireless networking. In the Ethernet settings, for example, you can specify network elements manually in the same way you would for a desktop computer:
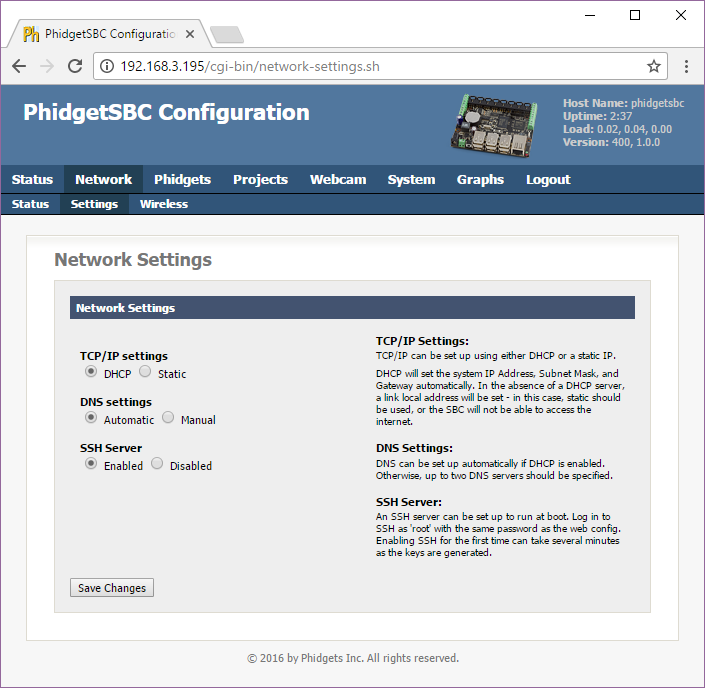
This setting is also useful to work entirely without mDNS and link local addressing. After setting it, the SBC will start using that static IP immediately, so if this is done improperly this can make the SBC very hard to re-connect to depending on the routing within the rest of your network. If you are not sure whether this will be a problem, it may help to read the in-depth network troubleshooting section for the SBC.
View Attached Phidgets
You can view Phidgets that are directly attached to the SBC by going to Phidgets → Status in the web interface:
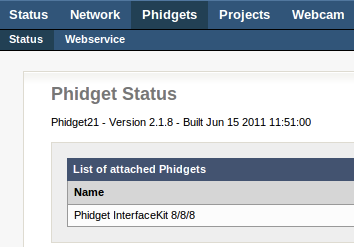
This will always show the attached Interface Kit that is part of the SBC board. It will also show any Phidgets plugged into the SBC's USB ports.
On the right hand side of this screen (not shown in the screenshot) you will see the serial numbers of the attached Phidgets. If you want to use these Phidgets within your code over a network using the webservice, you can use these serial numbers in your programming project.
Note that any analog or digital sensors will not show up here, as they are a 'part' of the Interface Kit and can be accessed through the ports in the Interface Kit API. Taking a look at the Getting Started page for the PhidgetInterfaceKit 8/8/8 will show you a good example of how this works.
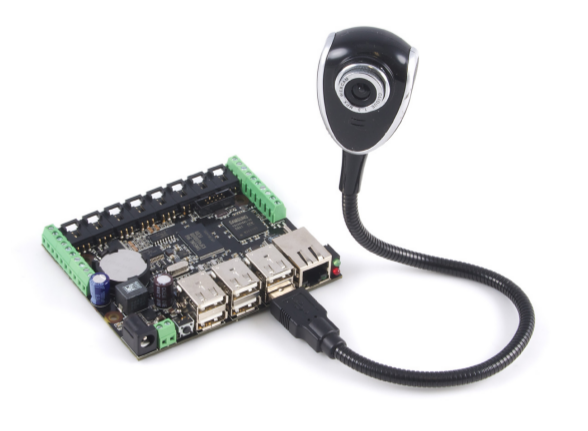
Use the Webcam
Using the webcam (either the Phidget USB Webcam or another UVC-compatible webcam) should be fairly straightforward. First, plug it in:
Then, head to the web interface under Webcam → Webcam:
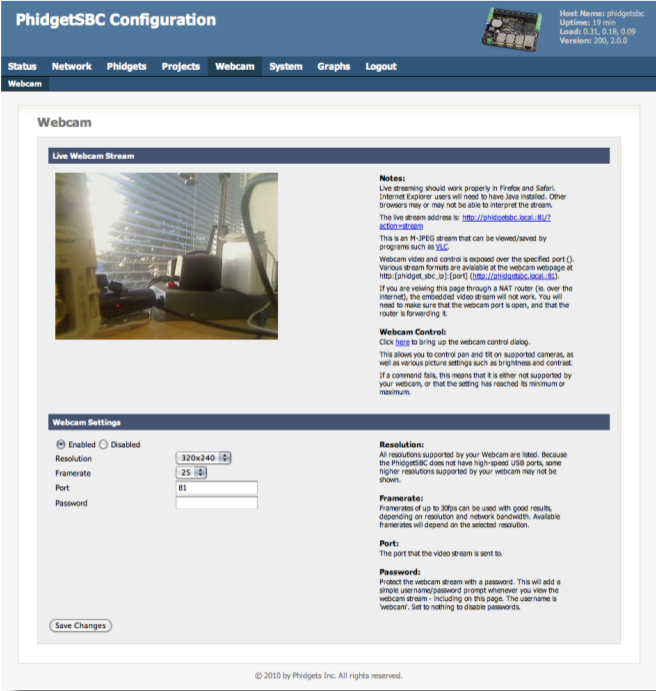
This will allow you to stream video into the web interface. This stream can also be viewed with any compatible M-JPG viewer, such as VLC. To take pictures with the webcam within your code, see the how-to on the main SBC operating system page.
Webcams that support pan/tilt can be controlled via the web interface. Multiple frame rates and resolutions are supported.
If the video stream is to be exported over the internet, it is recommended that the password be enabled. However, it must be noted that this is a simple HTTP authentication, which is sent unencrypted, and is thus not highly secure.
If prompted for the webcam password, the username is ‘webcam’.
If multiple webcams are attached, they will all start up using the same settings, except that each additional webcam will run on the next higher port number. Multiple webcams will generally only work when the resolution and framerate are set to low levels.
At this point, we have covered most of the common uses of the web interface. But the web interface offers many more configuration options. This reference section covers all of the available options. If you want to continue on to tasks such as writing and running code on the SBC, visit the OS - Phidget SBC page.
Advanced User's Guide
This section describes use of the PhidgetSBC outside of the web configuration, and basic opening of Phidgets over the network. This includes custom applications, using the included gcc compiler, using SSH, customizing the system, and building your own filesystem and/or kernel from sources. It is recommended that you have some experience with Linux before trying some of these tasks.
Custom Applications
The PhidgetSBC supports custom user application written in either Java or C. Custom applications are set up and managed using the configuration interface. Alternatively applications can also be created using the command line tool ‘createapp’ - the tool will guide you through the set up process.
Custom applications are created under the /mnt/userspace/userapps/(application name) directory and contain all application files. This must include at least the executable file.
Java applications must be compiled on a separate development machine, where they can also be tested before deployment. When coding, make sure to include the correct version of phidget21.jar file as part of the environment. You can use the link under Userspace: Applications page in the configuration interface to ensure that your Java program is synchronized with the version of phidget21 on the PhidgetSBC. When using Java packages, make sure to create the appropriate directory for them.
The PhidgetSBC also supports .jar files and you may find it easier to compile an upload a .jar instead of the all the necessary .class files. When your project is completed we recommend to compile the project as a .jar. This reduces the number of extra flies created into a single package that is easier to manage and can be executed from the command line, or even by double clicking the file if you operating system environment is configured properly.
Under the command line, you can use the jar utility from the Java SDK to package the .class and .java files. The process starts by going to the directory where your program is located and creating a manifest file. This manifest file tells the java jar compiler the version of the program and the name of the Main-Class which acts as the entry point for the application. The entry point is the class that contains the main method that is run when the program is started. You also want to add a line to specify the class-path which will point to the phidget21.jar file that contains the library for including into the jar.
Let’s assume we want to distribute our program MyProgram.java as an executable jar file. First, compile the program to generate the .class files. Now, create the manifest file MyProgram.mf which contains the following lines:
- Manifest-Version: 1.0
- Class-Path: phidget21.jar
- Main-Class: MyProgram
Save the file and close it. Create the jar by running the following command from the command line:
- jar cmf MyProgram.mf MyProgram.jar MyProgram.class MyProgram.java SupportClass.class SupportClass.java.
You should now have an executable jar file called MyProgram.jar that you can distribute easily as one package and run from anywhere very easily. To run the executable jar file you can either type the following into the command line:
- java -jar MyProgram.jar
Or, you can double click the file in a visual operating system if your environment is configured properly.
Note: Some IDEs, such as Eclipse and Netbeans, automatically create jar files when you build your project. Simply look in your build output folders for your .jar file. Java applications can also be directly executed through SSH using jamvm.
i.e.: jamvm –jar MyProgram.ja
C programs can be compiled on the PhidgetSBC itself, via the SSH interface, or off-board using a cross compiler. Use of a cross compiler is not strictly documented here, but it is possible to build one from the buildroot distribution available on our web site. When developing C applications on the PhidgetSBC, it is recommended that you log in using the ‘user’ account instead of ‘root’. If you need to log data from a custom application, you can either log directly to the application directory with the size limits of the userspace in mind, or to /tmp if the data should be erased on reboot. Alternatively, you can use a
flash drive, which are mounted automatically at /media/usb(0-9) when plugged in. Note that custom applications should not try to get user input, as stdin is closed before the application gets run.
GCC
The PhidgetSBC contains full GCC and associated build tools, as well as make and gdb for compiling C source. Use of these is the same as on full linux, just keep in mind that there is no swap space and userspace is limited. Compiling will also be slow for complicated programs. Simple programs are ideal for this environment. The C library used is uClibc. For most uses this should be similar to full libc, just much smaller. Also, when compiling a program that links with libphidget21.so, you need to add ‘-lphidget21 -ldl -lpthread -lm’ to the command line. Otherwise, you will get segfaults.
Phidget Dictionary
Communication between a custom application on the PhidgetSBC and the outside world can be facilitated by using the dictionary interface of the Phidget Webservice. The dictionary lets you set and listen for key/value pairs over the network, and take action accordingly. This could be used to post data or listen for commands over the network, while maintaining reliability and ultimate control on the PhidgetSBC itself in case of network failure. See the Phidget Programming manual for its use in your language of choice.
SSH
The built-in SSH Server can be enabled to allow console access to the PhidgetSBC. By default, this server is disabled. SSH access to the PhidgetSBC is enabled in the Network: Network configuration page on the PhidgetSBC. Projects on the PhidgetSBC should be stored in the user home directory (/home/user). Enabling the server for the first time can take several minutes as the encryption keys are generated. Once SSH is enabled, connect to the PhidgetSBC using its hostname or IP address (e.g. ‘ssh user@phidgetsbc.local’). You should login using the restricted ‘user’ account using the initial password set for the ‘root’ account. The password for the user account can be changed any time either through the unrestricted root account or directly through the user account. Files can be sent to the board using scp or by uploading through the web interface in Userspace: Userspace Browser. The SSH server does not support sftp. Text files (source code, etc.) can be edited using vi or with the web interface. On Windows, we recommend Putty for an SSH client. You can get this at http://www.chiark.greenend.org.uk/~sgtatham/putty/download.html.
Customization
If you wish to customize the root filesystem, you have two options: customize locally on the board, or build a custom kernel and filesystem from source. If you mess up the firmware while customizing, you can always perform a board reset and start again. You may also want to to add new libraries or kernel extensions, add new Unix tools, update certain aspects, delete others, change the boot process, etc. All of this is possible, but it is also completely unsupported by Phidgets. In order to customize the root file system of a running PhidgetSBC, you will need to remount the filesystem as readwrite with the command: ‘mount -o remount,rw /’. At this point you can change any files in /, just keep in mind the amount of free space. Once the SBC is rebooted, / will again be mounted as read-only.
Custom Kernels and Filesystem
You can build the complete filesystem and kernel from the same codebase as Phidgets Inc. uses. The full Buildroot system can be downloaded from our website. Phidgets Inc. does not provide support for custom filesystems or kernels, nor do we provide advanced tutorials on the buildroot system. However, this basic information should be enough to get started. Buildroot works by building a full cross-compiler for the PhidgetSBC and then using that to build a full set of tools to create a root filesystem from scratch. It also handles building the kernel. You can use the cross compiler that it produces to build your own applications for the PhidgetSBC independently of the system, or integrate your code into the process. Buildroot downloads all of the source code it needs from open-source repositories, so the Buildroot distribution itself is fairly small. Buildroot needs to be run on Linux. Unpack the distribution and run the following commands to set everything up:
- `touch .config`
- `make BOARD=phidget_sbc getconfig`
You can build your filesystem by typing ‘make’ and change configuration options using ‘make menuconfig’. Output binaries are located in binaries/phidget_sbc - the .bin files are accepted by the PhidgetSBC upgrade system. Building the full filesystem relies on some packages which you will need to install into your Linux distribution, including but not limited to: libacl1-dev, zlib1g-dev, kaffe, liblzo2-dev. If you make changes to config files, source, etc., run ‘rm_root’ before running make, otherwise the filesystem may not be updated properly. Kernel patches are stored in: target/device/PhidgetSBC/. More information about Buildroot can be found here: http://buildroot.uclibc.org/docs.html
Technical Details
Rebooting/Resetting the PhidgetSBC
To reboot the device, quickly press the black reset button found between the USB connectors and the power terminals. Both Ethernet Port LEDs (yellow-connectivity, green-activity), and the green status LED will turn off. The reboot is done when all LEDs come back on in about 25 seconds.
To reset the firmware, press and hold the button for 10 seconds until the green status LED begins to blink, then release. Both Ethernet Port LEDs will turn off (yellow-connectivity, green-activity) for 80 seconds; the green status LED will then turn off; then all LEDs will come back on in 20 seconds. All data will be lost and the operating system will be reset to a factory state.
To boot into the Recovery / Upgrade system, hold the button for 20 seconds until the green status LED switches from blinking slowly to blinking quickly, then release. The recovery system allows for factory reset, full system upgrades and recovery of the main system.
Recovery / Upgrade System
The recovery / upgrade system is a small system from which the main system can be reset/upgraded, or recovered.
Entering the Recovery System
The recovery system can be entered in two ways.
- From the ‘System: Backup & Restore’ web interface page.
- By holding down the reset button for 20+ seconds - until the green light has switched from flashing slowly to flashing quickly.
Upgrades
Generally, you should not need to do a full system upgrade. Upgrades are meant to be performed via the package system, and Phidgets maintains it’s own package repository from which to push out updates.
Occasionally, you may wish to go back to a clean install and upgrade to the latest rootfs/kernel from Phidgets. Phidgets will not be creating these images with every release of phidget21 as we did with PhidgetSBC1, rather they will be released several times a year, as needed for major changes not easy to push out via packages.
You can also flash your own custom kernel or root filesystem image.
Factory Reset
This restores the kernel and root filesystem from backup, overwriting any changes that may have been made. This is equivalent to holding down the reset button for 10 seconds.
Recovery
If the main filesystem has been damaged/misconfigured in such a way that it won’t boot, you may be able to fix the issue / recovery important files before running a reset. The recovery system runs an SSH server that you can loginto for console access. Username/password is: root/root.
You can mount the main root filesystem with the following commands (assuming it’s not damaged):
- ubiattach /dev/ubi_ctrl -m 6
- mount -t ubifs /dev/ubi0_0 /mnt
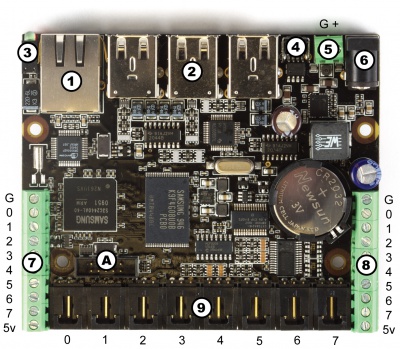
Ports and Connectors
|
Numbered in the circles on the diagram:
|
| |
- 1. This Ethernet port is used for network connectivity to the PhidgetSBC. This enables access to the PhidgetSBC as well as any connected Phidgets through the webservice. Alternatively, the USB Wireless adapter can be used for network connectivity.
- 2. These USB ports can be used for connecting Phidgets, Wi-Fi adapters, flash drives, webcams, USB hubs, etc.
- 3. These LEDs indicate the status of the PhidgetSBC. The Red LED indicates that the power supply is on and running properly. The green LED indicates boot status. The green LED will turn on and off once during boot and then turn back on when everything is running.
- 4. This will reboot the board if pressed once. Note that this is a forced reboot. Any user programs that were running may leave their data in a inconsistent state, but this is safe for the base system. A soft reboot can be performed remotely from the configuration interface.If held for more then 10 seconds, the red LED will start to blink and enter emergency Reset mode. Once the button is released, the onboard memory will revert to a factory-fresh state. This includes overwriting the kernel and root file system, and erasing all configuration, user data, and applications. If held for more then 20 seconds, the Recovery/Upgrade system will be booted, from which a Factory Reset/Full filesystem upgrade can be performed.
- 5,6. The PhidgetSBC can be powered from either the terminals or the barrel connector.
- NOTE: The polarity labeled on the bottom of the board is incorrect. The correct polarity is shown in the above image.
- 7,8,9. The Interface Kit I/O is explained in the Interface Kit section of the manual.
Power Over Ethernet
Power over Ethernet can be used to provide both a network connection and power to a device when a power outlet is not available. This means that with the proper adapters, you can run the PhidgetSBC entirely off an Ethernet source. The PhidgetSBC does not draw power directly from a powered Ethernet line, but instead can use a setup where the power is split to a separate line again near the PhidgetSBC. The board has been tested and will work with Power Sourcing Equipment that can output 6-12VDC.
Hardware Layout
The PhidgetSBC is based around the SC32440 processor. This is an ARM-920T based microprocessor from Samsung, which runs at 400MHz. Connected to this is 64 MB of SDRAM, 512 MB of large page NAND and a 10/100baseT Ethernet controller. The microprocessor brings USB Host port is connected to a 7-port USB 1.1 Hub chip. The integrated PhidgetInterfaceKit 8/8/8 is connected to one of the hub ports, with the other 6 ports being brought out to the user.
Software Layout
The PhidgetSBC runs Debian/GNU Linux as its operating system and gets booted with U-Boot. The kernel is 2.6.x and generally kept up to date with the latest releases. The root filesystem is created using Buildroot and is mounted in a ~460MB nand partition using the UBIFS filesystem, in Read-Write mode.
Configuration data is located at ‘/etc/webif’. This is where all configuration that can be set through the website is located.
User applications are stored in ‘/usr/userapps’, each is their own directory.
The kernel is stored on bare Nand in it own 3MiB partition, in the uImage format.
Date and Time
The date and time are set using ntp (network time protocol) at boot. The ntp daemon continues to run in the background and will periodically update the clock, keeping it very close to real time.
There is a real-time clock with battery backup which will preserve date/time across reboots, power removal. The real-time clock is synced to system time during reboot/shutdown. If power is unplugged suddenly, the real-time clock may not have the correct time.
Wireless Networking System
Wireless networking is supported using the available adapter and is configured through the configuration interface.
Configuration System
The configuration system used by the website is stored in ‘/etc/webif’. These files should generally not be changed manually, but there is no reason why they could not be. It’s very easy to enter invalid data that could cause the system to behave unexpectedly or not boot.
Nand Layout
The board contains 64MB on Nand. This nand is split into 7 partitions as follows:
| 0: u-boot | size: 256K | Read Only |
| 1: u-boot_env | size: 128K | Read Only |
| 2: recovery_kernel | size: 2M | Read Only |
| 3: kernel | size: 3M | Writable |
| 4: flashfs | size: ~3.625M | Read Only |
| 5: recovery_fs | size: ~ 43M | Read Only |
| 6: rootfs | size: ~ 460M | Writable |
The final size of flashfs/recovery_fs/rootfs depends on the image size at production, and on the number/location of bad blocks in the NAND.
U-Boot and recovery kernel and filesystem cannot be written from Linux - this is a safety measure.
Boot Process
This describes the boot process from power on.
- Processor loads first 4 bytes from NAND into Steppingstone and runs it.
- Steppingstone sets up RAM, copies u-boot from NAND into RAM and runs U-Boot.
- U-Boot initializes the processor, sets GPIO state, etc., copies the linux kernel into RAM, sets up the kernel command line arguments, checks that the kernel image is valid, and boots it.
- Linux boots, bringing up USB, Networking, NAND, etc. and then mounts the rootfs NAND partition on /.
- init gets run as the parents of all processes, as uses the /etc/inittab script to bring up the system. This includes mounting other filesystems, settings the hostname, and running the scripts in /etc/init.d, among other things.
- inittab then turns the green LED on.
- inittab then sets up a getty on the first serial port, ready for interfacing using the debug board.
Drivers for USB to Serial adapters
The SBC kernel contains driver support for the following USB to Serial Adapters. Please consult the kernel documentation for details into the driver support for the USB to Serial adapters.
| Company | Product |
|---|---|
| ConnectTech | WhiteHEAT |
| Keyspan | USA-18X, USA-28, USA-28X, USA-28XA, USA-28XB, USA-19, USA-19W, USA-19QW, USA-19QI, USA-49W, USA-49WLC |
| FTDI | Single Port Serial Adapter |
| Cypress | M8 CY4601 Family |
| Digi International | AccelePort USB Serial |
| Belkin | USB Serial Adapter F5U103 |
| MCT | USB Single Port Serial Adapter U232 |
| Inside Out Networks | Edgeport Serial Adapter |
| Prolific | PL2303 |
U-Boot
U-Boot is used for setting up the processor and booting Linux, and is only accessible by the serial port. Normal users will not need to use it. If you are connected to the serial port, you will see the U-Boot prompt shortly after power up. You can view the environment variables for information on how to properly boot Linux on the PhidgetSBC.
Be very careful when modifying the u-boot partition. If it is damaged or overwritten, it is difficult to fix.
Refer to U-Boot documentation here: www.denix.de/wiki/DULG/Manual for more information on using U-Boot.
Further Reading
Check the Phidget SBC page for more details about using the Phidget SBC.
Check the 1018 User Guide for more information about the InterfaceKit on this board.
API
The Phidget SBC has the same API functions and events as the PhidgetInterfaceKit.
Check the 1018 User Guide for API details.