1024 User Guide
Part 1: Setup
Part 2: Using Your Phidget
About
The PhidgetRFID reads data from RFID tags that transmit in the 125kHz range and use a supported protocol. When the tag is brought near the surface of the PhidgetRFID, if the antenna is enabled it will inductively power the tag, which will transmit its data.
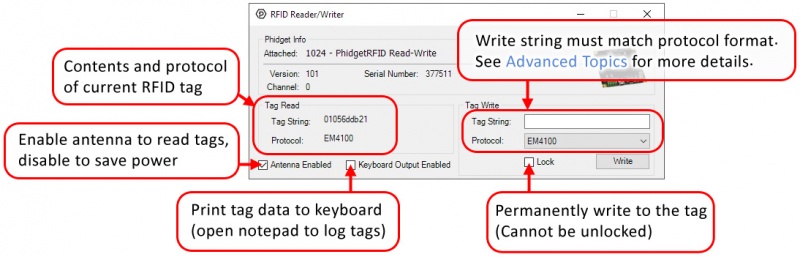
If you have a writable tag, you can also use the PhidgetRFID to write custom data to the tag. The tag data must conform to the protocol's format. See the Advanced Topics section below for more details.
Explore Your Phidget Channels Using the Control Panel
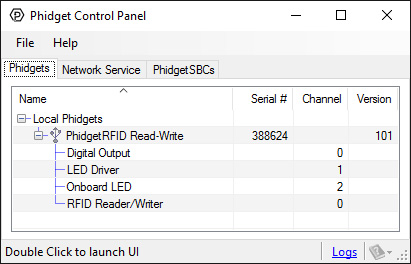
You can use your Control Panel to explore your Phidget's channels.
1. Open your Control Panel, and you will find the following channels:
2. Double click on a channel to open an example program. Each channel belongs to the Voltage Ratio Input channel class:
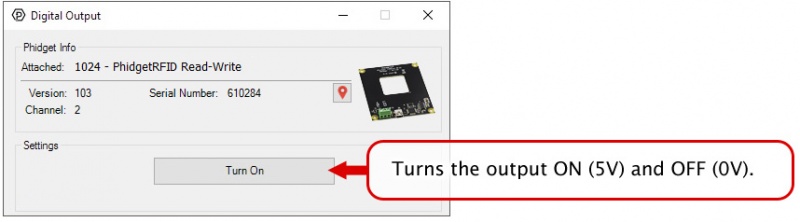
In your Control Panel, double click on "Digital Output":
In your Control Panel, double click on "LED Driver":
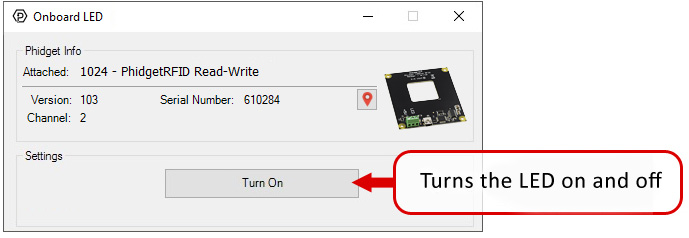
In your Control Panel, double click on "Onboard LED":
In your Control Panel, double click on "RFID Reader/Writer":
Part 3: Create your Program
1. Setting up your Programming Environment
Part 4: Advanced Topics and Troubleshooting
Before you open a Phidget channel in your program, you can set these properties to specify which channel to open. You can find this information through the Control Panel.
1. Open the Control Panel and double-click on the red map pin icon:

2. The Addressing Information window will open. Here you will find all the information you need to address your Phidget in your program.

See the Phidget22 API for your language to determine exact syntax for each property.
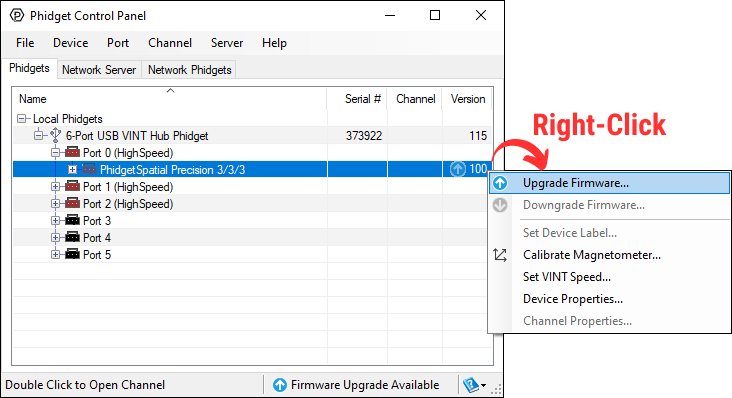
Firmware Upgrade
MacOS users can upgrade device firmware by double-clicking the device row in the Phidget Control Panel.
Linux users can upgrade via the phidget22admin tool (see included readme for instructions).
Windows users can upgrade the firmware for this device using the Phidget Control Panel as shown below.
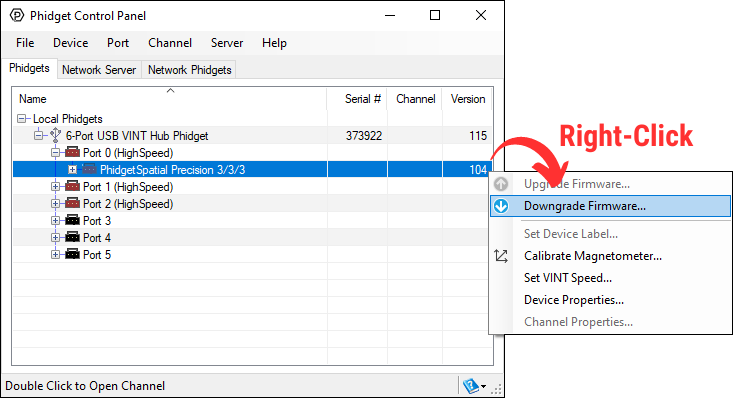
Firmware Downgrade
Firmware upgrades include important bug fixes and performance improvements, but there are some situations where you may want to revert to an old version of the firmware (for instance, when an application you're using is compiled using an older version of phidget22 that doesn't recognize the new firmware).
MacOS and Linux users can downgrade using the phidget22admin tool in the terminal (see included readme for instructions).
Windows users can downgrade directly from the Phidget Control Panel if they have driver version 1.9.20220112 or newer:
Firmware Version Numbering Schema
Phidgets device firmware is represented by a 3-digit number. For firmware patch notes, see the device history section on the Specifications tab on your device's product page.
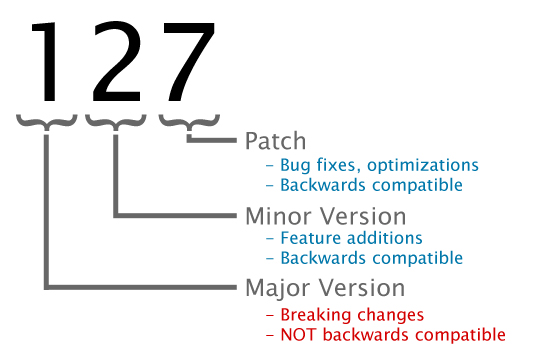
- If the digit in the 'ones' spot changes, it means there have been bug fixes or optimizations. Sometimes these changes can drastically improve the performance of the device, so you should still upgrade whenever possible. These upgrades are backwards compatible, meaning you can still use this Phidget on a computer that has Phidget22 drivers from before this firmware upgrade was released.
- If the digit in the 'tens' spot changes, it means some features were added (e.g. new API commands or events). These upgrades are also backwards compatible, in the sense that computers running old Phidget22 drivers will still be able to use the device, but they will not be able to use any of the new features this version added.
- If the digit in the 'hundreds' spot changes, it means a major change has occurred (e.g. a complete rewrite of the firmware or moving to a new architecture). These changes are not backwards compatible, so if you try to use the upgraded board on a computer with old Phidget22 drivers, it will show up as unsupported in the Control Panel and any applications build using the old libraries won't recognize it either. Sometimes, when a Phidget has a new hardware revision (e.g. 1018_2 -> 1018_3), the firmware version's hundreds digit will change because entirely new firmware was needed (usually because a change in the processor). In this case, older hardware revisions won't be able to be upgraded to the higher version number and instead continue to get bug fixes within the same major revision.
A protocol is a way of encoding data on an RFID tag. We support three reading and writing protocols with the 1024:
EM4100
EM4100 (also known as EM4102) is the protocol that all previous PhidgetRFID readers have supported. Therefore, if you want to use the 1024 to write to writable tags to be read with previous versions of the PhidgetRFID, you need to write them in this protocol first. This protocol encodes 40 bits of arbitrary data. Read-only tags that are factory programmed with this protocol are supposed to be unique.
Phidgets represents this protocol as a 10-digit hex string, include leading 0's (e.g. 0087f3bc91). This is the format to use for writing new tags, and to expect from the tag events.
ISO11785 FDX-B
ISO11785 defines tags used for animal IDs. If you have a pet cat or dog, chances are high that they have one of these tags implanted. FDX-B refers to the way that the ISO11785 data is encoded on the RFID tag, and is the industry-standard encoding scheme.
This tag consists of a 10-bit country code and a 38-bit unique ID.
The country code is ISO 3166. The '999' code is set aside for testing.
The unique ID is 38-bit unsigned, so that's a range of 0 - 274,877,906,943.
Phidgets represents this protocol as a 15-digit decimal number string - concatenated 3-digit country code and 12-digit id. For example, 999000000000123 would represent the testing country code and an id of 123. Please note that the 12-digit id part cannot exceed the 38-bit maximum integer value of 274,877,906,943.
Note that Animal tags with a valid country code are supposed to be unique. Of course, with the 1024 you can freely copy an existing Animal Tag.
PhidgetsTAG
The PhidgetsTAG protocol is an internal protocol only supported by the PhidgetRFID 1024.
This protocol allows storing an ASCII string, up to 24 characters (e.g. I am a Phidgets Tag!)
The ASCII data must be 7-bit, so no extended ASCII support, but standard text is all supported (as well as control codes).
If you are using multiple RFID readers, placing them too close together will cause interference when reading tags. You could work around this problem by rapidly "polling" each 1024 by turning the antenna on, checking for tags, and then turning it off in sequence. Of course, this will lengthen the amount of time it takes for your system to read a tag, since you may have to wait for the nearest reader to become active.
| Phidgets Inc | |
| 1024_0 | |
| FCC ID: SUT1024-0 |
- This device complies with Part 15 of the FCC Rules. Operation is subject to the following two conditions:
- (1) This device may not cause harmful interference, and
- (2) This device must accept any interference received, including interference that may cause undesired operation.
- Note: The manufacturer is not responsible for any radio or TV interference caused by unauthorized modifications to this equipment. Such modifications could void the user’s authority to operate the equipment.
- The user is cautioned that any changes or modifications not expressly approved by the party responsible for compliance could void the user’s authority to operate the equipment.
- This equipment has been tested and found to comply with the limits for a Class B digital device, pursuant to part 15 of the FCC Rules. These limits are designed to provide reasonable protection against harmful interference in a residential installation. This equipment generates, uses and can radiate radio frequency energy and, if not installed and used in accordance with the instructions, may cause harmful interference to radio communications. However, there is no guarantee that interference will not occur in a particular installation. If this equipment does cause harmful interference to radio or television reception, which can be determined by turning the equipment off and on, the user is encouraged to try to correct the interference by one or more of the following measures:
- • Reorient or relocate the receiving antenna.
- • Increase the separation between the equipment and receiver.
- • Connect the equipment into an outlet on a circuit different from that to which the receiver is connected.
- • Consult the dealer or an experienced radio/TV technician for help.
- This unit was tested with shielded cables on the peripheral devices. Shielded cables must be used with the unit to ensure compliance.
When trying to read tags, you should allow the tag to remain within detection range for at least 50ms. Tags moving through the detection area faster than this may not register at all.
For more information on RFID readers and tags, visit the RFID Guide.