Products for USB Sensing and Control


The PhidgetEncoder is intended to be used as a human interface, not as a device to measure shaft speed of motors or pulleys. If you are looking for an encoder to measure shaft speed, have a look at the 1057 PhidgetEncoder HighSpeed.
The PhidgetEncoder uses a two-bit continuous rotation mechanical encoder with a built-in momentary-action pushbutton switch. It returns 80 counts for 360 degrees of rotation.
With it you can:
| Board Properties | |
|---|---|
| API Object Name | Encoder |
| Controlled By | Encoder Interface |
| Electrical Properties | |
| Count Rate Max | 80 cycles/s |
| Current Consumption Max | 20 mA |
| USB Speed | Low Speed |
| Physical Properties | |
| Operating Temperature Min | 0 °C |
| Operating Temperature Max | 70 °C |
| Customs Information | |
| Canadian HS Export Code | 8471.80.00 |
| American HTS Import Code | 8471.80.40.00 |
| Country of Origin | CN (China) |
| Device | Object Name | Channel |
|---|---|---|
| Encoder Dial | Encoder | 0 |
| Dial Pushbutton | DigitalInput | 0 |
| API | Detail | Language | OS | |
|---|---|---|---|---|
| Encoder | Visual Studio GUI | C# | Windows | Download |
| Encoder | JavaScript | Browser | Download | |
| Encoder | Objective-C | macOS | Download | |
| Encoder | Swift | macOS | Download | |
| Encoder | Swift | iOS | Download | |
| Encoder | Visual Basic .NET | Windows | Download | |
| Encoder | Max/MSP | Multiple | Download | |
| DigitalInput | Visual Studio GUI | C# | Windows | Download |
| DigitalInput | JavaScript | Browser | Download | |
| DigitalInput | Multi-Channel Example | JavaScript | Browser | Download |
| DigitalInput | Objective-C | macOS | Download | |
| DigitalInput | Swift | macOS | Download | |
| DigitalInput | Swift | iOS | Download | |
| DigitalInput | Visual Basic .NET | Windows | Download | |
| DigitalInput | Max/MSP | Multiple | Download |
| Date | Board Revision | Device Version | Comment |
|---|---|---|---|
| January 2003 | 0 | 100 | Product Release |
| July 2004 | 0 | 110 | Protocol modified to allow multiple encoder input expansion |
| September 2011 | 0 | 111 | Firmware optimized |
| January 2015 | Product Discontinued. | ||
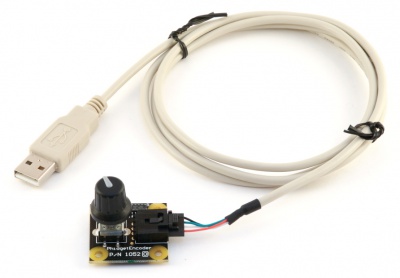
Welcome to the 1052 user guide! In order to get started, make sure you have the following hardware on hand:
Next, you will need to connect the pieces:
Now that you have everything together, let's start using the 1052!
In order to demonstrate the functionality of the 1052, the Phidget Control Panel running on a Windows machine will be used.
The Phidget Control Panel is available for use on both macOS and Windows machines.
To open the Phidget Control Panel on Windows, find the ![]() icon in the taskbar. If it is not there, open up the start menu and search for Phidget Control Panel
icon in the taskbar. If it is not there, open up the start menu and search for Phidget Control Panel
To open the Phidget Control Panel on macOS, open Finder and navigate to the Phidget Control Panel in the Applications list. Double click on the ![]() icon to bring up the Phidget Control Panel.
icon to bring up the Phidget Control Panel.
For more information, take a look at the getting started guide for your operating system:
Linux users can follow the getting started with Linux guide and continue reading here for more information about the 1052.
After plugging the 1052 into your computer and opening the Phidget Control Panel, you will see something like this:
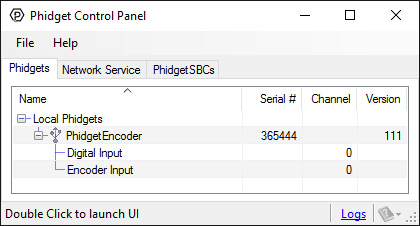
The Phidget Control Panel will list all connected Phidgets and associated objects, as well as the following information:
The Phidget Control Panel can also be used to test your device. Double-clicking on an object will open an example.
Double-click on the Encoder object, labelled Encoder Input, in order to run the example:
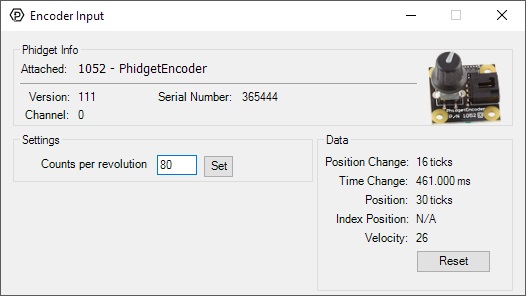
General information about the selected object will be displayed at the top of the window. You can also experiment with the following functionality:
Double-click on the Digital Input object in order to run the example:
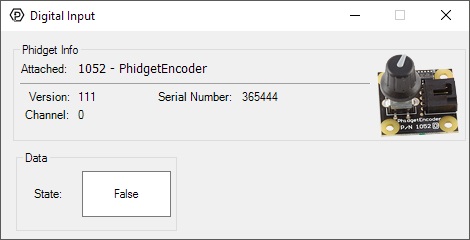
General information about the selected object will be displayed at the top of the window. You can also experiment with the following functionality:
Before you can access the device in your own code, and from our examples, you'll need to take note of the addressing parameters for your Phidget. These will indicate how the Phidget is physically connected to your application. For simplicity, these parameters can be found by clicking the button at the top of the Control Panel example for that Phidget.

In the Addressing Information window, the section above the line displays information you will need to connect to your Phidget from any application. In particular, note the Channel Class field as this will be the API you will need to use with your Phidget, and the type of example you should use to get started with it. The section below the line provides information about the network the Phidget is connected on if it is attached remotely. Keep track of these parameters moving forward, as you will need them once you start running our examples or your own code.

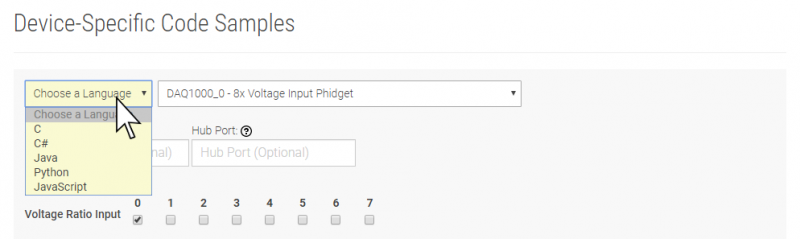
You are now ready to start writing your own code for the device. The best way to do that is to start from our Code Samples.
Select your programming language of choice from the drop-down list to get an example for your device. You can use the options provided to further customize the example to best suit your needs.
Once you have your example, you will need to follow the instructions on the page for your programming language to get it running. To find these instructions, select your programming language from the Programming Languages page.
If you want to learn more about encoders in general, check out the Encoder Guide.
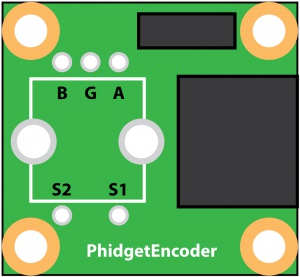
If you decide that the mounted encoder does not meet your requirements it is possible to use other two-bit mechanical encoders. Optical encoders with large counts per revolution should not be expected to work with this device. To change the encoder the user will have to carefully desolder and remove the existing encoder. However, if you attempt to remove the encoder the warranty willl be void and we can not offer technical support.
Since your new encoder may not have the exact same pin configuration, you should use wire to connect your new encoder to the appropriate pins on the PhidgetEncoder board. We have tested the following encoders, and found that they can be used as replacements:
| Manufacturer | Part Number | Description |
| CTS | 290UAA5F201B2 | 2-Bit 9mm 20CPR Encoder Detent w/MO SPST |
| CTS | 290UAA5F201B1 | 2-Bit 9mm 20CPR Encoder Non-Detent w/MO SPST |
| CTS | 288V232R161B2 | 2-Bit 16mm 16CPR Encoder Detent w/MO SPST |
Note: Most of the above components can be bought at Digikey.
| Channel Name | API | Channel |
|---|---|---|
| Encoder Input | Encoder | 0 |
| Digital Input | DigitalInput | 0 |